
*Compensated affiliate links used where possible at zero cost to you. No posts are ever sponsored or paid.*
Remember One Sheet Wonders? This used to be ALL the rage in the late 1900s. You would stamp a full 12x12 sheet of cardstock and do ink blending (with SPONGES, like ANIMALS in the time before blending brushes) and then there were all these different patterns - (there's a whole gallery of them here -both templates and examples) - that you would use to cut them up and make them into cards.
The concept was that you would use EVERY BIT of the paper. It was a very efficient way to make a BUNCH of cards for swaps, which were also a big deal then. This was in the time before personal die cutting, so this was all done with a paper trimmer, so lots of straight lines in these patterns.
Nearly every time I make a background and use dies, I do a modified version of a One Sheet Wonder, because with backgrounds you almost always at least get a twofer. Today I got a threefer, in this updated, modern version of a OSW.
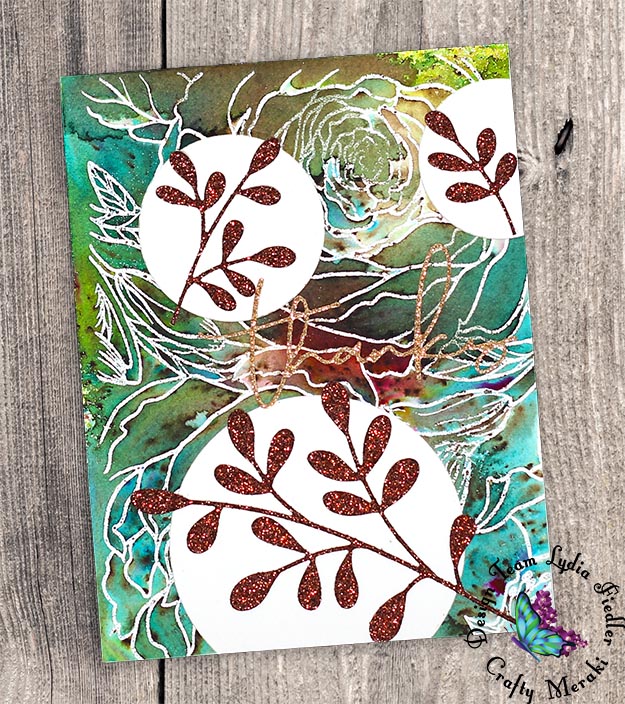
To start with, I used this big floral background stamp with white ink and white embossing powder on cold press watercolor paper - a 5x7 sheet. After embossing, I sprinkled green and magenta watercolor powders all over it, and used my fine mister to activate the powder. The more water you use, the more the colors mix, so I like the fine mister for this job, because these are multi-colored powders and I wanted the different colors to all show.
I let that air dry, and when it was dry I used my circle infinity dies to cut three circles out of this background. In the openings, I used the fall glitter paper with this leaf die to decorate them. I used the holiday glitter paper and this thanks die to finish the card.

 CURRENT COUPON CODES
20% off anything at Glassboard Studio - UNDERSTANDBLUE.
15% off anything at Marker Universe or any of their other sites - Understandblue15.
10% off at Sweet Sentiment with code UNDERSTANDBLUE
10% off the whole store at A Colorful Life Designs - LydiaFan10
5% off at LBC here with code LYDIA5
Arkon Mounts - 20% off sitewide with code UNDERSTANDBLUE

Like this post? Never miss a post by following me!
I took those circles that I cut and I arranged them on a stitched background I created with this cover die. I used the darker fall glitter paper and the same thanks die to finish this card.
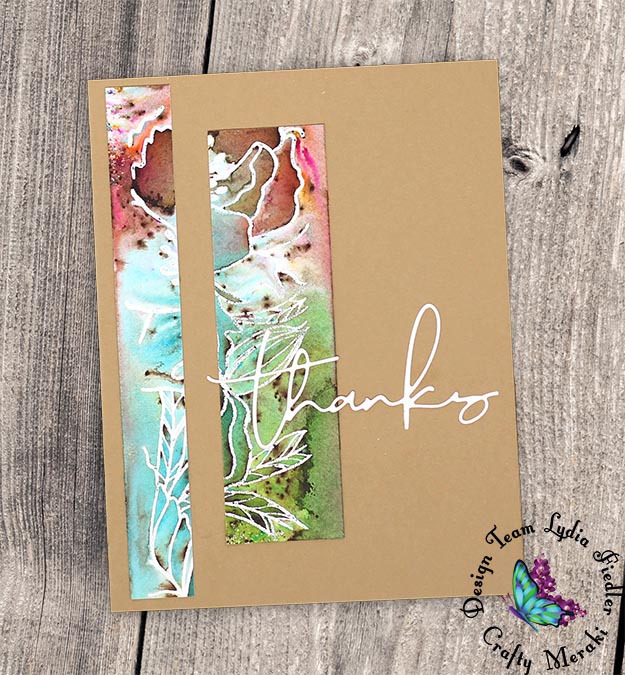
Now because the watercolor paper was 5x7, there was excess I had to cut off after die cutting the first panel, so, in true OSW style, I used those strips for a third card. It captured the very edge of the stamped pattern. I used the paper from this assortment for the card base, and the same thanks die with white cardstock to finish.
20% off anything at Glassboard Studio - UNDERSTANDBLUE.
15% off anything at Marker Universe or any of their other sites - Understandblue15.
10% off at Sweet Sentiment with code UNDERSTANDBLUE
10% off the whole store at A Colorful Life Designs - LydiaFan10
5% off at LBC here with code LYDIA5
Arkon Mounts - 20% off sitewide with code UNDERSTANDBLUE
|


Think about any 6x6 background stamps you have as a platform for quickly making multiples, especially as the holidays approach.
If using powdered watercolor, I find detailed stamps like this work the best, because there's so much color variation in the powder. If using liquid watercolor or ink smooshing, try bold images!
Loveyameanitbye.

Fabulous cards!!!
ReplyDeleteWhat a great idea to get more use out of big backgrounds!
ReplyDelete