Monday, March 27, 2023

Desert Doubles - a Twofer Card Set + A Die Placement Trick

*Compensated affiliate links used where possible at zero cost to you. No posts are ever sponsored or paid.*

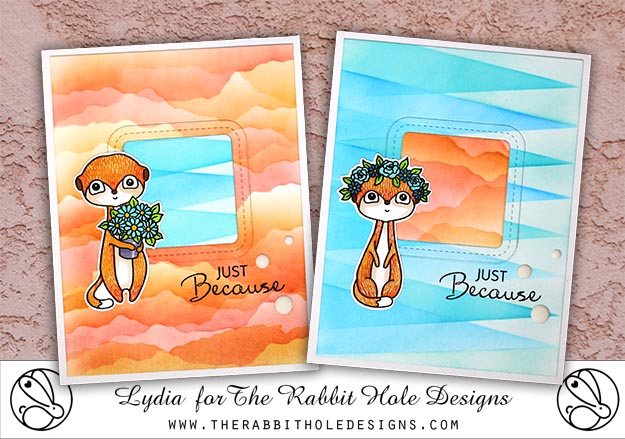
Next time you're in New Mexico, stopped at a stoplight, take a gander at the little grassy island to your left, and you might just suddenly see that they are TEEMING with prairie dogs. It's so completely adorable. Somewhere, five phones ago, I have the cutest video of some on the busiest street in Santa Fe, popping up out of their little holes. 

When I just so happened to see the combo of these stencils and these adorable meerkats, that's right where my mind went, so I had to create a desert scene - well actually two - the joy of frame die cuts! 

First, I created the blue panel with the triangle negative and positive stencil/mask. I used Sea Glass, Blue Raspberry and Blue Lagoon inks, keeping it light. 

I set that aside and used the paper stencil to create my desert - overlapping Tangerine Twist, Honey Mustard and Faded Brick.

Then I die cut them both with a stitched square die - it double cuts so you get the square in the middle too. 

Now here's the trick. To place them in exactly the same spot on each card front, place the die cut panel over the uncut panel. Snap the frame portion of the die into the opening of the die cut one on top. Then put the center square into the opening - use a little temp adhesive if you need to. Remove the die and the die cut panel. On the uncut panel, snap the frame die into place around the center square, tape it, and remove the square and then off to your machine!

PS this is one of my very favorite die sets and it's discontinued, but here are some very similar dies in different shapes

I colored these with OLO Markers and added a teeny bit of white gel pen for their fur - look closely!

I swapped the centers of the frames for a window feel. She has LOTS of fun extras with this meerkatty release including free shaker mixes with purchase. I LOVE the MATTE enamel dots she has that I used here. You know what's cool about these? Since the surface is matte - YOU CAN INK BLEND THEM - so you can have dots that perfectly match your card! She shows examples here.

Brilliant.

Like this post? Never miss a post by following me!


Hey - I found a new dairy free ranch recipe I'm going to try this week - I'll let you know!

Loveyameanitbye.


CURRENT COUPON CODES
20% off anything at Glassboard Studio  - UNDERSTANDBLUE.
10% off anything at OLO MARKER
15% off anything at Marker Universe or any of their other sites - Understandblue15.
10% off at Sweet Sentiment with code UNDERSTANDBLUE
10% off the whole store at A Colorful Life Designs - LydiaFan10
5% off at LBC here with code LYDIA5
Arkon Mounts - 20% off sitewide with code UNDERSTANDBLUE


Friday, March 24, 2023

VIDEO: Aged Tin Technique + Giveaway

*Compensated affiliate links used where possible at zero cost to you. No posts are ever sponsored or paid.*

I've been in SUCH a vintage mood lately. And I know I've posted a LOT of embossing videos lately, but y'all have to realize that when I started stamping, the only embossing you could do was with a metal plate and a stylus! Where's my cane??

I also have not yet run out of ideas for embossing folders yet, so I'm going to keep going - that's why I'm in the embossing folder club! This month's is the one I'm showing you today

I posted the video for this technique previously, so I'll put that below, but for this one, I'm using the 5x7 black and white sheets and a sanding block.

The little piece of ephemera is from this collection, which is featured in my art journaling basics class - I'll link that preview below as well, and then I just used my favorite layering die. No stamping! It's hard to see but the top layer of the die is glitter paper.


Like this post? Never miss a post by following me!

Here's the video I did on this technique:


If you want to get started art journaling, the ephemera I used today is part of the 


Ready for a giveaway and some more club inspiration? 

Leave me a comment for a chance to win a $25 credit at Spellbinders! 
And leave comments on the blogs below, which have tons more inspiration today.


Spellbinders
💙💙💙Me💙💙💙


CURRENT COUPON CODES
20% off anything at Glassboard Studio  - UNDERSTANDBLUE.
10% off anything at OLO MARKER
15% off anything at Marker Universe or any of their other sites - Understandblue15.
10% off at Sweet Sentiment with code UNDERSTANDBLUE
10% off the whole store at A Colorful Life Designs - LydiaFan10
5% off at LBC here with code LYDIA5
Arkon Mounts - 20% off sitewide with code UNDERSTANDBLUE

Have a great weekend! Loveyameanitbye.


Tuesday, March 21, 2023

Nick Bantock Inspired Vintage + Phenomenal Lemon Bread Recipe

*Compensated affiliate links used where possible at zero cost to you. No posts are ever sponsored or paid.*

When I was creating this journal page for my Art Journal Basics class, you watched me create a little envelope that I didn't use on the finished page, so I'm showing the card I created that matches that page and I used the sweet little envelope.

I remember reading Griffin & Sabine SO VIVIDLY - opening all the little envelopes on those beautiful page, and it was just so very magical. Any time I can grab a small envelope die, I do it for that reason.

This envelope die set is cool because a) it fits these little stamp ephemera strips perfectly and b) you can create an optional window in the front so the contents are visible - for this one I used matte duralar. Those little stamps then become a gift attached to the card front - you can send this to a crafty friend and they can use those as ephemera on their next card! (Or enclose real postage stamps!)

The supplies I used are essentially the same as in the journal page class - the paper, stamps, envelope die, thanks die, paint and more - you can find the full list on the class page here - click supply list lesson. The process is the same as well.


Like this post? Never miss a post by following me!

I hope you have a great week lined up!

I have a yumtastic recipe for you today! Whenever I can find local lemons, I buy as many as I can because they are not waxed, and I zest them and freeze the zest - I won't zest a grocery store lemon or lime - too much gross stuff on them. So Farmhouse had a bunch of Meyer lemons and I bought a TON and zested and juiced them all. Normally before I freeze the juice and zest I will make lemon bars, but an Irish woman I follow on TikTok caught my eye with a lemon recipe I thought I'd try and boy am I glad I did. The texture of it is amazing - it has a very tender, cake feeling - not that denseness you get with banana bread. I'm not sure if that's because it's part almond flour? I also got some vegan powdered sugar to make the lemony glaze with. I HATE powdered sugar - it tastes like death to me, and I think it's because it's made with bone char. I hate jello and non-vegan marshmallows for the same reason - they smell and taste like roadkill to me. And after I posted about this on Facebook, I found out that most of my friends didn't know about bone char in sugar either, so there you go. There are lots of vegan brands of regular sugar - just google them. The one I used is this one - I get it on Instacart, but it's in lots of places.

Saturday, March 18, 2023

VIDEO: Fresco Resist Technique

*Compensated affiliate links used where possible at zero cost to you. No posts are ever sponsored or paid.*


Here's the video I promised with this gorgeous embossing folder, this resist stick 

There's a giveaway on YouTube so be sure and click "more" to see the full description - 
you can watch on YouTube here.


Loveyameanitbye.

Like this post? Never miss a post by following me!


CURRENT COUPON CODES
20% off anything at Glassboard Studio  - UNDERSTANDBLUE.
10% off anything at OLO MARKER
15% off anything at Marker Universe or any of their other sites - Understandblue15.
10% off at Sweet Sentiment with code UNDERSTANDBLUE
10% off the whole store at A Colorful Life Designs - LydiaFan10
5% off at LBC here with code LYDIA5
Arkon Mounts - 20% off sitewide with code UNDERSTANDBLUE


Wednesday, March 15, 2023

New Fresco Resist Technique & Live Watercolor Video

*Compensated affiliate links used where possible at zero cost to you. No posts are ever sponsored or paid.*

This has been the craziest week, with an unexpected oncology appointment for Splotchy - that's a whole thing because it's so far away - complete opposite side of town, and I have to just wait in the car for hours because driving back and forth is expensive and dumb, to the time change, and any number of associated insanity with that. It's just a whole thing, this Ides of March!

I've been so busy I haven't even cooked at all, so I have no new recipes for you at the moment, but I do have some pretty cards - will that work?

I'm super excited about the technique behind the first two cards, but the video - you will have to wait three days for that - you can see that on the YouTube hop WITH giveaways that I will be a part of on Saturday.

It's a modification of my fresco technique, with a fun twist. I used a new 3D embossing folder, this resist crayon, Inktense blocks and the MISTI - on the card on the left - to get that pink  glow on the sentiment - just stamp the sentiment in one color, then very slightly shift your cardstock and stamp it in the second color - so easy! 

Like this post? Never miss a post by following me!

AND I have a video for this card too that you'll see later, but this is an incredible layering and interactive egg crate die! I can't wait for you to see how it goes together and how much fun it was to watercolor all the pieces. But can we talk about the basketweave paper please? My art journal is crying out for this and now I only have a little bit left! PAPER HOARDING ENGAGED.

I chose all granulating watercolor from my Daniel Smith splits for this, because both egg cartons and eggs have porous surfaces that needed to be highlighted with granulating watercolors. 


And for the first time in a LONG time, I stamped my sentiment on colored cardstock - why don't I do this more often?? The complementary color is just what I love. 

There's so much more to come, but I can't leave you without showing you these gorgeous layering bird dies. If you missed the live today, here's the unedited video complete with chitchat showing you how these beautiful birds go together. Finished card coming soon.


Enjoy me ramblling about all this here LOL.


I really hope tomorrow is easier than this three days has been!

Loveyameanitbye.


CURRENT COUPON CODES
20% off anything at Glassboard Studio  - UNDERSTANDBLUE.
10% off anything at OLO MARKER
15% off anything at Marker Universe or any of their other sites - Understandblue15.
10% off at Sweet Sentiment with code UNDERSTANDBLUE
10% off the whole store at A Colorful Life Designs - LydiaFan10
5% off at LBC here with code LYDIA5
Arkon Mounts - 20% off sitewide with code UNDERSTANDBLUE


Saturday, March 11, 2023

Turning Modern into Vintage & New Art Journal Basics Class

*Compensated affiliate links used where possible at zero cost to you. No posts are ever sponsored or paid.*

When I first started trying to develop my own stamping style, the style I was drawn to the most was vintage style, but I was TERRIBLE at it. For me, it took a long time to learn what makes something an attractive vintage card or art journal page. 

If you feel like that, I have a very easy hack for you today, that I posted YEARS ago that changed a lot for me - and that was using glazing to tone down a modern image and make it appear vintage. 

Whether you've colored an image yourself, or are using a pre-colored image like this bird I'm using today, this trick will work. What you do is using a silicone spatula (this creates the texture), apply clear gesso to the image. While it's wet, drop in this warm gold fluid acrylic and swipe to cover the panel. 

The rest is easy! I used this beautiful vintage stamp set and ephemera collection to create a collage, and then splattered the whole thing with white and aqua gloss acrylics, and gold fluid acrylic paint. You could even make a bunch of these, put them all on a big table and splatter them all at the same time. SO easy and quick - waiting for the gesso to dry is the longest, and so worth it. 


Like this post? Never miss a post by following me!

I have a new $5 class today! I was creating this beautiful journal page and I realized that it has alllll the elements that help me create a new page from scratch every single time I sit down to art journal, and thought I'd share that process, because to me, the most intimidating part is just STARTING. If that's what's keeping you from journaling, you will love this quick and easy class. You can see the full supply list for this page (with or without the class) HERE. I LOVE this whole collection - it inspires me! 

What you will learn in this class is the five elements I think are essential for making pages you love and the ways that you can incorporate those to remove the intimidation from that blank page! 


I hope you have a crafty weekend lined up! It's gorgeous here, so I'll be shoring up the garden.

Loveyameanitbye.


CURRENT COUPON CODES
20% off anything at Glassboard Studio  - UNDERSTANDBLUE.
10% off anything at OLO MARKER
15% off anything at Marker Universe or any of their other sites - Understandblue15.
10% off at Sweet Sentiment with code UNDERSTANDBLUE
10% off the whole store at A Colorful Life Designs - LydiaFan10
5% off at LBC here with code LYDIA5
Arkon Mounts - 20% off sitewide with code UNDERSTANDBLUE


Monday, March 6, 2023

Fruits & Veggies + Giveaway

*Compensated affiliate links used where possible at zero cost to you. No posts are ever sponsored or paid.*

Eat your fruits and veggies! We've all heard that all our lives, right? One time I heard something from a doctor I've never forgotten, especially since my first job was in a health food store during a time when juicing was the supposed cure for everything, from politics to cancer. Seriously. It was an insane craze. But then in the last twenty years or so, I heard a doctor say something that made so much sense - he said "don't drink your fruit" - meaning, don't drink juice. At first it sounds shocking, right? Juice is good for you. But he went on to explain it by saying - would you ever sit down and eat five oranges at once? No? Then don't drink them in a glass. It's too many calories, and just doesn't make sense. I had never thought about it that way, but now that I have a dairy allergy - if you think about it, almond milk seems similar, so I actually asked an almond milk manufacturer. Almond milk is much more normal - it's only five to six almonds in a glass of almond milk - that's a completely normal serving size. I actually would never use a full cup of almond milk because I just use a bit of it for coffee - not 8 oz. - so I feel good about that. But I wouldn't eat five oranges, so I don't drink commercial orange juice. I do juice my own fruit for recipes etc. but I avoid drinking large quantities of the juice. Funny how sometimes info like that just clicks.

I try to eat mostly whole foods - meaning food in as close to its original form as possible. So instead of canned pineapple, I look for a whole pineapple, etc. I enjoy breaking it all down myself into "ingredients" and in my opinion, fruits, veggies and all plants are beautiful, so they are most often the subject of my watercolor sketches. 

I was THRILLED to see the Hero kit this month with it's beautiful produce! They are large images, so fun to watercolor, which is exactly what I did with the main kit and the NEW NEON WATERCOLOR - I love it so much. It's so bright and happy. I used the orange, yellow and chartreuse, along with Coffee to create this still life. The sentiment is from the set.


Like this post? Never miss a post by following me!

Here's what the kits look like - classic and premium. I love that the premium kit has some of the neon watercolor!


But Y'all. THE GROCERY BAG DIE. It's so cute!!! It looks just like a grocery bag - adorable. It has little tabs you attach to the card OR cut two of them and put them together for a stand-alone bag for a tag, gift, etc. I stamped it with this sweet, food-themed cling in kraft on kraft, and then used these stamps and dies to add food - I colored the white outlines kraft to match.

CURRENT COUPON CODES
20% off anything at Glassboard Studio  - UNDERSTANDBLUE.
10% off anything at OLO MARKER
15% off anything at Marker Universe or any of their other sites - Understandblue15.
10% off at Sweet Sentiment with code UNDERSTANDBLUE
10% off the whole store at A Colorful Life Designs - LydiaFan10
5% off at LBC here with code LYDIA5
Arkon Mounts - 20% off sitewide with code UNDERSTANDBLUE

Here's what all the add-ons look like - I LOVE the strawberry basket.


If you've seen my artistic scene class here, you'll recognize this technique with the new window die from the premium kit. It really makes the produce pop. I used the fun little clay dragon fruits from the classic kit to glue onto the matching fruits in the scene.

The opening showcases some of the neon watercolor on this stone paper. I have an online class for techniques with this paper here. Look for the butterfly class.


This was my sneak peek from yesterday - using this fun cling from the classic kit in white on kraft, with the berries from the kit.


Ready to be inspired? See a full blog hop with more samples starting HERE. Leave me a comment and leave comments on the way to be entered to win a $50 gift card!

Loveyameanitbye.


Friday, March 3, 2023

Berry Season!

*Compensated affiliate links used where possible at zero cost to you. No posts are ever sponsored or paid.*


Are you ready for your RDA of fruits and veggies?? It's that season, and since that is one of my FAVORITE themes for stamps and dies, I can't wait to show you all the sweetness in the new Hero Arts kit and premium kit on Monday

You will LOVE one of the little interactive dies too - it's so cute, and speaks to my grocery loving heart!

Today I'm peeking the little berries in the main kit - big enough to color but still quick - I did these with one marker each, a colorless lift and a white gel pen - and they look so real!

Like this post? Never miss a post by following me!

Are you registered for the Spring Stamp-A-Long? 
I'm teaching and you won't want to miss my mixed media class! 
You can register here.


See you Monday! Loveyameanitbye.


CURRENT COUPON CODES
20% off anything at Glassboard Studio  - UNDERSTANDBLUE.
10% off anything at OLO MARKER
15% off anything at Marker Universe or any of their other sites - Understandblue15.
10% off at Sweet Sentiment with code UNDERSTANDBLUE
10% off the whole store at A Colorful Life Designs - LydiaFan10
5% off at LBC here with code LYDIA5
Arkon Mounts - 20% off sitewide with code UNDERSTANDBLUE


Thursday, March 2, 2023

Detailed White On White Card + The Best Oatmeal Cookies

*Compensated affiliate links used where possible at zero cost to you. No posts are ever sponsored or paid.*

I've worked hard on my cookie game since 2020. One cookie I've never been able to say I've perfected is oatmeal raisin cookies. I'm a complete weirdo about cookies. I cannot STAND cakey cookies - soft cookies. They HAVE to be either crispy or extremely chewy. For example - I love lace cookies, because they are both. I love Anzac biscuits because they are chewy. Same with macaroons.

One of my problems with most oatmeal cookies is that they are soft/cakey. I have several good recipes - including a few that I've put on my blog - use the search feature for one recipe with dried cherries that's quite good. 

But unlike my brown butter fleur de sel chocolate chip cookies, which I can for sure say are the best chocolate chip cookies in the world, I didn't have a recipe like that for oatmeal cookies, until very recently. So I'll share that with you and my dairy-free version after the card. 

Today's card is sort of the beginning of a mini-series on stitching dies. I love stitching dies, and not just for stitching, as you can see in today's card with this stunning multi-part stitching die.

The only piece not from this set is the Thank You, which is in this set of dies.

The detail is so incredible even without stitching I had to do a white on white example - look at the deboss detail with the stitching guides - it's pretty all by itself. I think it would make a stunning wedding card.

Like this post? Never miss a post by following me!

Ready for cookies? These are my dairy free modifications and notes to an absolutely wonderful recipe.

Original: HERE


2 cups old-fashioned oats

1 cup pecans, chopped

1 cup all-purpose flour

½ teaspoon kosher salt

½ teaspoon baking soda

½ teaspoon ground cinnamon

⅛ teaspoon freshly ground nutmeg

¾ cup (1½ sticks) unsalted Miyoko’s butter, room temperature

¾ cup (packed) light brown sugar

¼ cup granulated sugar

1 large egg, room temperature

2 tablespoons pure maple syrup

2 teaspoons vanilla extract or paste

1 cup raisins, dried sour cherries, and/or dried cranberries

Preparation

Step 1

Preheat oven to 425°. Spread oats on a rimmed baking sheet and toast until lightly golden, about 6 minutes. Add pecans, toss to combine, and continue toasting until pecans are fragrant and oats are deep golden brown, about 6 minutes more. I think 6 minutes, flip cookie sheet, then stir a LOT for four or so more minutes.  Let cool slightly.

Step 2

Whisk flour, salt, baking soda, cinnamon, and nutmeg in a medium bowl; stir in oats and pecans.

Step 3

Using an electric mixer on medium speed, beat butter, brown sugar, and granulated sugar in a large bowl, scraping down sides of bowl, until light and fluffy, 3–4 minutes. Add egg, syrup, and vanilla and beat until incorporated, about 1 minute. Reduce speed to low; add dry ingredients and raisins and continue to beat, scraping down sides and bottom of bowl, until just combined. Let sit at room temperature at least 1 hour to hydrate oatmeal. All the reviews say don’t skip this.

Step 4

Preheat oven to 350°. Line 2 rimmed baking sheets with parchment paper. Using a 2-oz. ice cream scoop, portion cookies and place on sheets, spacing 3" apart (or measure out mounded scoops with a ¼-cup measuring cup). Do not flatten; cookies will spread as they bake.

Step 5

Bake cookies, rotating sheets halfway through, until edges are golden brown and firm but centers are soft, 15–17 minutes. Let sit on sheets 10 minutes, then transfer to wire racks; let cool.

Step 6

Do Ahead: Cookie dough can be made 3 days ahead; cover and chill. Let dough come to room temperature before baking.


This very well may be the perfect oatmeal cookie!! Here are notes in addition to what’s in red and strikethrough above. 

  • I did let it sit for an hour to rehydrate the oats. 

  • I chilled it for a few hours and then let it come to room temp before cooking. 

  • I weigh my cookies so each ball was about 1.76 oz. 

  • I cooked them for 7:30, flipped the cookie sheet, 7:30 - cooking time was perfect.


CURRENT COUPON CODES
20% off anything at Glassboard Studio  - UNDERSTANDBLUE.
10% off anything at OLO MARKER
15% off anything at Marker Universe or any of their other sites - Understandblue15.
10% off at Sweet Sentiment with code UNDERSTANDBLUE
10% off the whole store at A Colorful Life Designs - LydiaFan10
5% off at LBC here with code LYDIA5
Arkon Mounts - 20% off sitewide with code UNDERSTANDBLUE

Loveyameanitmakesomecookiesbye.


Related Posts Plugin for WordPress, Blogger...