Showing posts with label Organization. Show all posts

Tuesday, April 18, 2017

A New World (Ink) Order

I have had zero "free" crafting time this month, sadly. I have traveled every week in April - my next trip is in a few days. I've been hopping with the MISTI team all month and been in a few other blog hops, so I've done lots of projects for those, but not any real unstructured play time. Until yesterday. I finished the samples that I needed to get done for The Collins Show on Sunday, and declared Monday a play day after work.

I have my pre-order from the catalog, and the stamp set to play with was a no-brainer. It's the Crafting Forever set, and it rocks. One of the sentiments says "Crafting forever - housework never."

And the people said -"Amen."

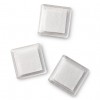
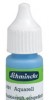
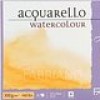
I wanted to try out the new masking fluid I got - it's from Schmincke, it's ammonia-free, and works beautifully. I had tried the Molotow masking pen with no real success - I found it got gummy during application, and doesn't work equally well on different papers. But regular frisket/masking fluid smells like the devil and I hate using it. So this - which is in a container with a very fine tip - made me feel like Goldilocks in the perfect bed. Easy to apply - even to those tiny paintbrushes - doesn't gum up and doesn't stink. I'm super happy with it. It comes in blue tint as well as colorless - I like the blue, because my vision isn't good enough for the colorless one.

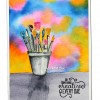
So I masked off the little pot and paintbrushes, and then built the background around them. I just finished it with a sentiment from the set. This is going to be a much loved set, I can tell. The other images are adorable too. It was very fun to watercolor.
No line watercolor by Understandblue


I did a video - and I'll be honest - I love doing videos for lots of reasons. I love teaching, so that's my favorite part. But right up there is the forced peace that takes place when I'm filming. I film with my phone, and so to start a video, I have to put it on do not disturb, and manually turn off all notifications so they don't interrupt my app. It's like that first time it snowed every year when I lived in New York - everything gets really, really quiet.

Sometimes, of course, I forget to turn it all back on, and then people think I'm dead. But it's really, really nice when it lasts. When social media is a big part of your job, like it is in my job - all the messages, and emails, and notifications can get crazily overwhelming, so taking a break from it is awesome. And as you know, the actual phone part of the phone I'd be happy to live without forever.

So yes, I highly recommend doing something creative every day. With your phone turned off. :)


In related news - on my Show Me Sunday team Facebook live a few days ago - I was stamping out the new In Colors I got to preorder, to show the team where they fit in the lineup of our existing colors.

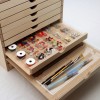
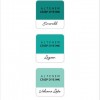
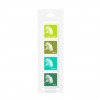
When I was doing it, I stamped them with the balloon image from Super Duper in little groupings with like colors. But what we found surprised us! The new Fresh Fig, which I expected to group with our purples, made a lot more sense in the burgundy range, as it is very warm. Pool Party was much more green than blue, and I had previously had it in the blues. So after the call, I became obsessed with grouping all my inks properly, so I stamped out ALL the colors that will be current in the new catalog and grouped them this way: Reds, pinks, oranges, yellows, greens, blues, purples and neutrals. Here's how it turned out - so if you have a compulsion to ROYGBIV all the things - this is the order that makes the most sense to me.

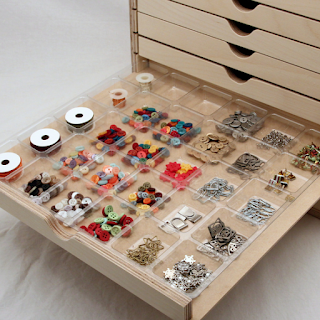
It was easiest for me to stamp and punch them out and move them around to where they made sense. I wrote the color name on the back, and then once it was the way I liked it, I glued it onto a piece of Whisper White.

Now I just need to put the actual ink pads in the right order in my storage and my mind will be at rest. :)


2017-2018 Stampin' Up! Ink Chart by UnderstandBlue

Hope you find that helpful.

A few final notes!


Loveyameanitbye.

Friday, March 17, 2017

The Ink Warchest

Recently I had the opportunity to attend a Stamp-n-Storage pop-up event in New Braunfels. I don't know why Brett chose Texas for this fun experiment, but I'm so glad he did. They hit three cities - Houston, Dallas, and the nearly mixed metros of Austin & San Antonio.

They had a trailer with tons of inventory on it that he drove down from Minnesota - narrowly escaping a snowstorm, and they partnered with local scrapbooking stores for the events.

I had a very singular purpose on the day of the event - get the drawer cabinet (at a nice discount!) and the accessory trays to create the mother of all mini ink cube storage.

But I'm not wired to do anything the easy way, so in my little brain while I was driving to the event, I thought - I can experiment with the Unicorn SPiT I bought after I saw it at CHA (no, I still don't want to call it Creativation) on my box! And a plan was born in the car on the way to the event.

Now mind you, I've painted furniture - you remember my refinish of the card catalog with chalk paint and wax - and it's a process I REALLY enjoy. In my mind, that card catalog is forever linked with the Serial podcast, because I started listening to it when I started working on that piece.

I love the process of sanding and starting over, and then building up layers until a piece of wood is finished, and - importantly - turquoise.

But I have never stained a piece of furniture (mostly because I won't work with smelly, toxic products if I can help it, but also because I am not a big fan of brown), and of course Unicorn SPiT is neither a paint nor a traditional stain, so this was uncharted territory.

I assumed the risk that I'd ruin the drawer cabinet, and I was okay with that.

So first I watched a bunch of videos about this unique stain - but all of them were somewhat vague about finishes, so I just made some decisions and went with them.

First of all, it's a non-toxic product, made in the USA, and it has no odor other than a faint jasmine scent they add, which is really nice. Since I had to work in a closed garage, this was important.

I lightly sanded the unit, and then applied the Zia Teal Unicorn SPiT with a brush. It's described as a gel stain and glaze. It beautifully highlights the wood grain and lets any patterns show through the stain, which was REALLY fun in comparison to my ultra-smooth chalk paint on the card catalog.

I applied three coats of stain I think, just to intensify the blue, sanding in between of course. The real fun of this product is mixing multiple colors on wood, but I felt like for my first attempt, I needed to stick with one.

When I had it the way I wanted it, the next step was to seal with an oil-based sealer. I chose 100% tung oil, again because it's more natural, but also because I'd never done an oil seal and I was curious. It was crazy! The wood absorbed the oil each night when I was done, and I could tell when it needed more. I ended up with three coats.

Here's where it got tricky. People on the internet don't always use their words. I read as much as I could about tung oil curing time and everyone said a day or similar. NUH UH. I waited 24 hours before trying the oil-based Poly final step (I wanted a glossy finish). That thing sucked that poly down into the depths of its soul like a Neil Gaiman monster.

I was mystified.

Back to the internet, where I found out that when some people say "tung oil" what they REALLY MEAN is "tung oil finish" which is a product with chemical drying additives that cure the oil faster. REAL tung oil finishes can take weeks. So into the guest room it went for a few weeks of curing.

When I brought it out and put the poly on again, I held my breath, but the beautiful, shiny finish was perfect.

The unique thing about Unicorn SPiT is that a varnish of any kind - the more the better - deepens the 3D effect of the wood grain. Their videos show really cool things happening when you put thick epoxy over the stain. I only had the patience for 3 coats of poly, but each time, I could see more dimension and depth and just absolutely loved it when I was done.

So without further ado - here she is. It comes with ten drawers and is sized to fit an IKEA Kallax.


The REAL reason I wanted it is the accessory trays they sell. Each tray fits in the drawers and holds 54 mini ink cubes. I just really like using the cubes better with the MISTI - way less messy.

So here are my Altenew mini inks.


And here are my Stampin' Up! inks. Well one drawer of them. The rest of the rainbow is in the drawer below this one. :)


I have one drawer full of Distress mini ink cubes, and one full of Hero Arts and Simon Says Stamp cubes. One drawer has my blank cubes in it.

So I still have FOUR TRAYS EMPTY - for only being 13x13 - this thing packs a GINORMOUS storage punch.

Now they have two different accessory trays.

There's this one - for either inks or embellishments.


http://www.stampnstorage.com/drawer-cabinet-accessory-tray/?#a_aid=understandblue


But I went with this one - because I knew it would maximize the space for ink, and that was my intention.


The trays are amazing and super inexpensive - they are also why the drawers don't have sides, which I think is genius.

I could not be happier with the way this came out.

Here it is in my Kallax. This is right outside the door to my tiny studio - and the blue just beckons :).


I'm trying to fight the urge to buy three more and do some more stain experimentation :)

Fantastically fun refinishing process and amazing storage solution.

What? Did I hear someone give me permission to go buy more inks for the rest of those drawers?

Yes - I think I did. BRB.

LoveyameanithappyStPatricksDaybye.

Wednesday, March 25, 2015

When To Look In Your Neighbor's Bowl

I went down a rabbit hole the other day - reading an article my friend Dana posted about not raising narcissistic kids, and it contained a Louis C.K. video that had SUCH a great piece of advice in it.

He was trying to tell an angry little daughter who didn't get something that another girl did get that she shouldn't be worried about what the other girl got, and he said this:

“The only time you look in your neighbor's bowl is to make sure that they have enough. You don't look in your neighbor's bowl to see if you have as much as them.”

I love that so, so much.

Lots of the world's problems could be solved with these two sentences I think. I couldn't think of one that couldn't.

Anyway, I just had to pass that along.

I've gotten some questions about my remodel post which you can see here. I have updated the post with a few links to my card display, etc. that I left off the original list, so check that out.

I also got a question about the dental floss - I use dental floss to remove elements of my card that are adhered down crooked - it's so thin and flat, and you just slide it between the layers and poof - it comes off like a dream!

And one person asked about my stamp cleaning tools. I use the Stampin' Scrub for my wood stamps and when I'm using either cling or clear stamps with blocks.

However, for background stamps and stamps on my MISTI I use a shockingly simple and inexpensive stamp cleaning tool that I found accidentally when I was refinishing my stamp table. I was using a non-toxic, no odor whey-based polyurethane from Vermont Naturals - and since it was high gloss, a brush wouldn't work because it would show strokes, so I had to use a furry pad to apply it. I bought a few different kinds to try and had a lightbulb moment.

This is my new stamp cleaner for background stamps and stamps on my MISTI:


I love it! I spray Stampin' Mist on one side and use the other side to dry. So easy to rinse out and it dries really fast by design. They have smaller ones too.

Finally, I converted my clear stamp storage to the pocket system shown by Jennifer McGuire. To give you an idea of how much space this saves, check these out.

Here are the cases I emptied and how they ended up. 

And here, you can see a bin containing 49 stamp sets takes up the same space as 15 sets in their boxes.

Jennifer likes the Avery Elle ones, which have a flap. But I know myself, and I know that the flap would drive me crazy, so I went on the hunt and I found some very inexpensive ones without a flap that are awesome! They are made by Ultra Pro and hold 5" x 7" items - here's a direct link.


I took cheap Mart of Wal cardstock, cut it to 5x7 and slipped that in. Then in went the stamp set, and on top of that, the stamp case insert, cut to 5" wide as you can see above -  this basically cuts the spine off.

Then I just purchased the fridge bins that she recommends and they are awesome too.


Now that I have these I can see why she likes them - that little pull handle on the front is really nice.

SHAZAM is this ever going to clear some shelf space. And you know what THAT means! MORE SHOPPING :).

I'm contemplating doing my cling this way too, but I don't want the cling foam to get squished, so I'll have to think about that one a bit more. I love it.

I was playing around with Indescribable Gift this week, and went in an uncharacteristically pastel direction with Chameleon Pens. I ended up really liking the "dawn" colors in this and I thought that was perfect for an Easter card. 


Pin It

Impossible to see in this photo, but there's Tim Holtz Frosted film all over the colored image, so the whole thing is sparkly.

My friends at Splitcoast actually have a review of Chameleon Pens in the newsletter today - you can see that here.

AND - I snuck in for a guest tutorial today as well on my Gilded Relief card. Here's that video, which has been blogged previously, and here's a link to the step-by-step tutorial.


Thanks for stopping by!

Loveyameanitbye.


Sunday, March 22, 2015

The Great Studio Remodel Video Tour

Stick a fork in my remodel - it is done! 

Pin It


Last night I had my "please buy all the stuff that no longer fits in my room" sale, which was extremely fun. I offloaded about 400 individual items to happy crafters and socialized with a bunch of awesome artists & neighbors.

I did sales and studio tours as a bookend to this project. My first sale was on November 1st - and they toured my studio then too. One of them even bought my desk, which really kicked the project into high gear. Then it was time to do demolition.

Demolition was brutal, I'm not going to lie. Taking apart the giant built in desk in there came close to killing us twice, and created huge messes during, which you'll see in the intro to the video.

Emptying the room was overwhelming. Sorting through it was overwhelming.

But I learned so many things I have to share with you.

  • For 12 years I existed in a totally dysfunctional space that just got more and more crowded. I grew to hate it, honestly. For about 8 of those years I whined about needing more space. Then one day last fall I woke up and said to myself "Self - you don't need more space - you need less STUFF." It truly was like a light switch, and then it began. 
  • You MUST empty the room. If I had not emptied the room I would have worked AROUND things I didn't feel like sorting. Because believe me, there were many days I didn't feel like sorting. This is non-negotiable. 
  • On the emptying, I did "loose" sorting. I carried things out to our breakfast area and GENERALLY put similar things together. But as I got deeper into the recesses of my closet that became more difficult because I hadn't had things organized at all in there. Once it was all in a big mountain in the breakfast area - my hand to God - I put tablecloths on it, put a star on top and that was our Christmas tree. The holidays were the best time for me to start this project, and so it just was what it was.
  • I lived in the room for about a month with just a temporary table. I put masking tape on the floor marking out furniture I knew was coming back in the room, and then started investigating what I could and couldn't do in that space. This was VITAL. Had I not done this I would have bought furniture based on aesthetics alone, not on how functionally they fit into the space I was designing. As you will see in the video - I completely maximized the space. I shopped online for items that were precisely the size I needed (Ikea shows you dimensions on hover over, which I love). On my desktop we cut it down to go exactly from the wall to the dresser, as you will see. I'm not one for "perfect" rooms, so I happily collected a series of colorful, fun, functional pieces that came together beautifully. Picking my anchor pieces (the card catalog and the dresser) and then using ONLY size as a criteria for the two work surfaces was perfection.
  • After the furniture was in, it was time for STRICT sorting. This is also non-negotiable. I got many, many boxes and I took everything from the "Christmas Tree" and sorted everything into boxes, throwing away a TON as I did. There was a lot of junk, including an AOL CD, if you can believe that. Our trashcan was full for three months. Nothing was allowed to cross-contaminate a pile - if it wasn't an object that matched other things in a box, it either started a new box or got tossed. This really helped me decide what to put in the dresser and what to put in the card catalog, based on the shape and the quantity of the items. The things in the card catalog tend to be longer, skinnier things: white gel pens, aquapainters, rulers, etc. The things in the dresser are bigger - things like post it notes, stamp cleaners etc.
  • I sold as I went. I started selling small things that were too good to throw away on our neighborhood FB page. If I could sell a storage item for $2 to someone, that was better than tossing it. I sold many things each day as I went through strict sorting. If you have a neighborhood garage sale group on Facebook, I highly recommend joining and participating.
  • After strict sorting I decided what boxes contained things I actually wanted. Many didn't make the cut and were sold or donated. Then I was ready to move in.
  • Through the move-in process I realized that many small drawers are INFINITELY better for craft storage than fewer, larger drawers. This is because when you have a large drawer you feel the need to fill it, which means you stop adhering to strict sorting. You think - well I know this is my hammer drawer, but I am going to put the masking tape in here because there's room. Well what happens is you can't remember that because it doesn't make sense to have the masking tape with the hammers, and that, my friends, is how you end up with 57 rolls of masking tape in 57 locations around the house. Stray from strict sorting even once and that's where you'll end up.
  • I also realized that my floor was the LEAST valuable real estate I had. What possessed me to use the "shove everything against the wall" layout before is beyond me. It's not like I was twirling around like a ballerina in there every day. So after seeing my friend Chriss' studio with a desk in the middle, I moved my desk to the middle. This did several things: It gave me much more storage space in the form of that dresser. It stopped me from facing a wall with my back to the door. I hadn't realized how much I'd hated that and never even consciously knew it until I changed it. I also realized this is the classic corporate America furniture design. And it needs to go away - it's dehumanizing. It allowed me to make good use of my storage bench, both for a cat lounging station and a human lounging station - I was delighted when someone sat down on it last night. - before, my room didn't allow for comfortable seating for a guest. Having my back to my computer while I'm arting is greatly increasing my focus. Similarly, having my back to my art while I'm working does the same. Small change - big difference. 
  • It was not easy. It was four months of really hard work - refinishing furniture, carrying heavy stuff, sorting, painting, sanding, tossing. It's not for the faint of heart. There were times - even a month ago - when I didn't think I'd ever get down to that last box - but I did. And it's amazing. If you're going to do it - do it all the way. I'm so glad I did. I'd say I wish I'd done it earlier, but I don't. I think things come to you when you're ready to do them and I was ready. And I was SO grateful for my Facebook friends, who watched the process, photo by photo, from the very start, and cheered me on the whole way. Thanks for lightening that burden, you silly friends.
I still don't have one piece finished and haven't decided what will go on the wall above my dresser, but I really can call this project done. And I love this space. It is most definitely the happy place I've dreamed about. If you're coming to the retreat, I might even organize a group tour - who knows?  :)

So take a look and let me know what you think. If you can't see the video player below, click here.  Below the video is a link to where I got all the things in the room.


What do you think? :)

Here's a list of the major things you'll see in the video, and where possible, links where you can read more or purchase them.
  1. Card Catalog - purchased from Remember When Estate Sales
  2. CeCe Caldwell Santa Fe Turquoise Paint
  3. CeCe Caldwell Endurance Wax Finish
  4. Dresser - purchased from Tommy's Furniture, Rockdale, TX.
  5. Desk - Micke White Modern
  6. Desk accessories - Poppin Orange trays and pen holder
  7. Refrigerator Cart - Elfa
  8. File Cabinets - Bisley Orange
  9. Art table tabletop - Ikea VikaFuruskog (no longer available), cut to size and refinished with Vermont Naturals Polywhey - natural, no odor polyurethane
  10. Tiny multi-drawer aqua cabinet purchased from Uncommon Objects.
  11. Label Maker
  12. Black labels with white print for card catalog
  13. Offi Punch Shelves (these appear to be discontinued)
  14. Oven liners used as craft mat
  15. Baby Wipe dispenser and homemade stamp wipes
  16. Combo ink/refill/marker holders
  17. Wallmounted ink/refill holders
  18. Embossing powder containers
  19. Embossing powder spoons and clips for spoons
  20. Paper storage towers
  21. Refrigerator cart
  22. Tripod Update - I now use the Arkon Stand - use code UNDERSTANDBLUE for 20% off.
  23. Iphone mount for tripod
  24. Art desk anti-fatigue stool
  25. Computer desk anti-fatigue stool
  26. Japanese circle stickers
  27. Card sending journal 
  28. Card display rack from Displays2Go
  29. Lights and light fixtures for filming videos 

So there you have it.

Worth every second. If you're ready - what are you waiting for?

Loveyameanitbye.


Related Posts Plugin for WordPress, Blogger...