Thursday, November 10, 2022

VIDEO: Faux Patina with 3D Embossing Folders

*Compensated affiliate links used where possible at zero cost to you. No posts are ever sponsored or paid.*

Hello friends! I'm digging out an old favorite today - a faux patina tile look, but in like the fifth different way that I've tried for this look. It seems like there are an endless number of ways to get this done, so I just keep trying. 

The original version, which is an older Splitcoast tutorial you can see here, has you ink the embossing folder on one side, which leaves you beautiful highlights to add color to. But I was using this awesome, large 3D embossing folder that really looks like tile, and I wanted a more blended look, and I also wanted to do a little scientific experiment with both the embossed and debossed sides using the same technique. You'll see the whole thing in the video, but the inks are: Mowed Lawn, Peacock Feathers, Vintage Photo and Juicy Embossing Ink. I used two dies to finish - the layered sentiments die and this awesome layering die - I actually left the dies on the packaging just as they came to get perfect layering! Yes, it works! The cardstock is my pre-cut and scored white base, Pitch Black and gold glitter paper
Stay tuned below the video for a PHENOMENAL new recipe.


Like this post? Never miss a post by following me!

Here's the video!


Okay so this week - y'all know I don't know how to use the TV. Everything I look at is on my computer, and the Other is in charge of the TV. So we watch a lot of cooking videos, and one was suggested (almost never works out for us) that we decided to try and HOLY COW was it good! Oh my word. The guy is from Romania, and I have to tell you - which you already know from reading my recipe notes, it's VERY rare for me to find a recipe that doesn't need tweaking. Some are poorly written, some have obvious problems with seasonings or measurements - it really is a skill to write an excellent restaurant. 

He did not give a name to this recipe so I don't know if this is a dish that is a cultural icon in Romania, but if not, it should be. One big disclaimer - I do not like pork except for bacon. I gave this a try because I always like to try a recipe before changing it, but I will make it next time with chuck roast instead because I just prefer beef. But that being said - everything about this was phenomenal - and the pork was tender and the sauce was stellar. If you like pork, you'll just fall over. So yummy. TRUST THE INGREDIENTS. If you don't eat any meat at all, I think this sauce would be incredible with portabellos, over mashed potatoes or on anything, really. I served this with mashed cauliflower, which I sub for potatoes a lot. SO yummy. Here it is with my notes. I hope you try it. I transcribed it from his video because it's not on his site yet - there's a link to his video as well - I recommend watching it first.

Loveyameanitbye.


CURRENT COUPON CODES
20% off anything at Glassboard Studio  - UNDERSTANDBLUE.
10% off anything at OLO MARKER
15% off anything at Marker Universe or any of their other sites - Understandblue15.
10% off at Sweet Sentiment with code UNDERSTANDBLUE
10% off the whole store at A Colorful Life Designs - LydiaFan10
5% off at LBC here with code LYDIA5
Arkon Mounts - 20% off sitewide with code UNDERSTANDBLUE



Tuesday, November 8, 2022

BOCK, BOCK, OINK!

*Compensated affiliate links used where possible at zero cost to you. No posts are ever sponsored or paid.*

I think one of the first full stamp sets I bought was a farm-themed set. I've never had my own farm, but if I had won the Powerball, I would definitely have a farm FULL of animals. My grandfather's family had chickens, and other members of his family farm in North Dakota. My dad's best friend had a farm as well. It's just something I love, so I snap up farm animal sets.

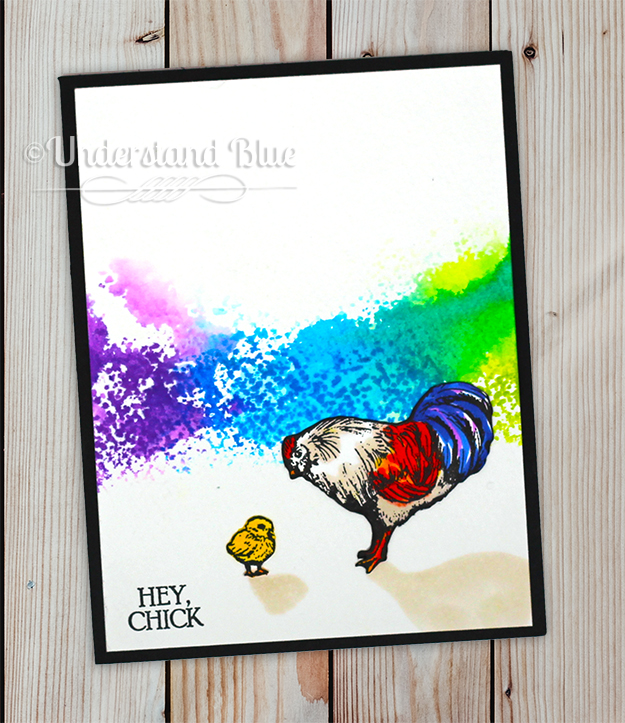
Today I have two cards with the same farm set. This first card was so much fun. I like using dye inks on watercolor paper, because if you smoosh the ink pad on glass instead of a craft mat, it goes onto the paper a little differently, and you can really see the texture of the paper itself. I used Wild Lilac, Key Lime and Blue Raspberry. Then I colored the rooster and chick with OLO markers, and created shadows. When I was done, I looked at it and thought I had made it look like the rooster was saying to the chick - "are you really my son?" :D 


Like this post? Never miss a post by following me!

I LOVE the pigs in this set too - there's a pair of them - I love it when companies do that so that characters can face each other, etc. I love the modular fence too - just stamp it multiple times to extend the length!

I used that as the basis of my scene, and drew in Charlotte, her web and her "some pig" message. 

Then I colored the grass, pig and shadows with OLO Markers, after ink blending the sky with Sea Glass. SUCH a cute scene.


CURRENT COUPON CODES
20% off anything at Glassboard Studio  - UNDERSTANDBLUE.
10% off anything at OLO MARKER
15% off anything at Marker Universe or any of their other sites - Understandblue15.
10% off at Sweet Sentiment with code UNDERSTANDBLUE
10% off the whole store at A Colorful Life Designs - LydiaFan10
5% off at LBC here with code LYDIA5
Arkon Mounts - 20% off sitewide with code UNDERSTANDBLUE

I hope you are having a good Tuesday. I'll have a new video for you tomorrow! :)

Loveyameanitbye.


Monday, November 7, 2022

Winter Black + Giveaway

*Compensated affiliate links used where possible at zero cost to you. No posts are ever sponsored or paid.*

I spent the weekend, as did many of you, at the Hero Arts Holiday Stamp-Along, and I was SO excited that the first and last cards were black holiday cards. It’s just oh so elegant! I think black isn’t used enough for Christmas. So I decided to start out today with a black tag with the new kit! The kit is FULL of tag dies for little scenic tag dies, and all of them can be mixed and matched, so that’s what I did. I focused on the critters in the kit because they are so tiny and beautiful, so for the tag, I used the base tag shape in black. There’s a little die that cuts a snowdrift, so I used that and the stars with holographic paper - IT IS SO SHINY AND COLORFUL! I arranged the little shooting star part to be centered over the ribbon hole so that I could slide the ribbon under it. The deer I originally also cut from holographic cardstock, but they needed more contrast, so I re-cut them in white and I love the way this looks. It looks like a super professional high end tag for a fancy present. You know - like a powerball ticket. :)


Like this post? Never miss a post by following me!

Here's what the full kit looks like! Look at all the separate dies!

The rest of the release has more tag dies or tag friendly dies that you can also use on cards. This die set has both a tree and a stocking, so I created a little watercolor forest by cutting the tree from this mixed media paper three times, and smooshing it into three colors of Hero Hues reactive ink. When they were dry, I made little ornament with gold Pearls. I like that you can control the size since it’s a squeeze bottle.


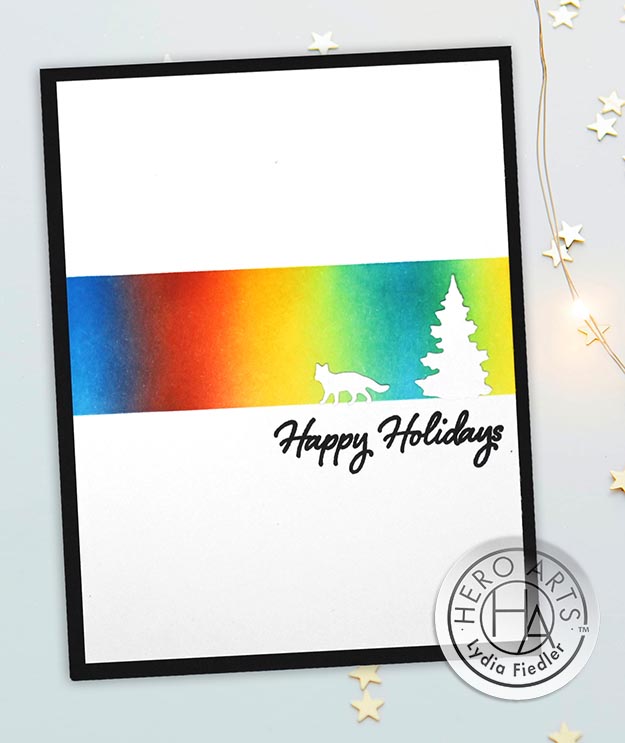
Finally, my little heat map card from my sneak peek yesterday. This is going to be my main Christmas card, so I will make multiples of this to send out - it’s so easy and fun and just uses simple masked ink blending and two of the tiny tag dies - the sweet little fox and a tree. Heat maps are a graphical way to show lots of things - you’re probably most used to seeing them in relation to weather, and particularly hurricanes. But in my job, we use them to analyze what people are looking at and interacting with on a website or an email. Red = high activity and blue = low activity. But I’m always distracted by how beautiful they are with all the mixing of primaries. The sentiment is from the main kit

CURRENT COUPON CODES
20% off anything at Glassboard Studio  - UNDERSTANDBLUE.
10% off anything at OLO MARKER
15% off anything at Marker Universe or any of their other sites - Understandblue15.
10% off at Sweet Sentiment with code UNDERSTANDBLUE
10% off the whole store at A Colorful Life Designs - LydiaFan10
5% off at LBC here with code LYDIA5
Arkon Mounts - 20% off sitewide with code UNDERSTANDBLUE
Here are all the add-ons - see the little string of lights that goes with the tree die I used?


Of course we have giveaways today! Just leave me a comment to be entered to win a $50 gift card!
The winner will be announced HERE the week of the 21st.

And PS - this weekend they announced a Valentine Stamp-Along! Sign up for that here for early bird pricing.


Hero Arts
Hero Arts Creative Team 


Friday, November 4, 2022

Christmas in 3... 2... 1!

*Compensated affiliate links used where possible at zero cost to you. No posts are ever sponsored or paid.*

Okay - is it just me, or was this October the LONGEST month ever? I swear it feels like it's been three months since the last My Monthly Hero Kit

I'm super excited about this one that's coming Monday because it has tiny scenic dies, which is pretty much my favorite. Throw in a FOX on top of that, and I'm sold. 

So today I have a sneaky peeky that I did in a heatmap style - just masking and ink blending and then adding the adorable little die cuts. 

If you like tags, this month is going to be your jam as you will see in the other peeks here. 

So fun. I'll be back with tags on Monday. In the meantime, enjoy this delicious soup I made tonight! This recipe with notes was shared by my friend Bev - link to original in title - my notes as always are in red.


Like this post? Never miss a post by following me!

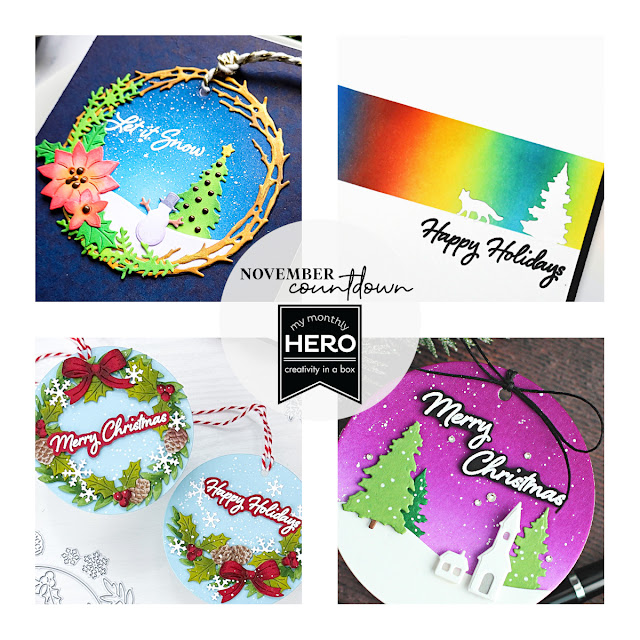
See you Monday! Check out the rest here or by clicking the photo!

Loveyameanitbye.


CURRENT COUPON CODES
20% off anything at Glassboard Studio  - UNDERSTANDBLUE.
10% off anything at OLO MARKER
15% off anything at Marker Universe or any of their other sites - Understandblue15.
10% off at Sweet Sentiment with code UNDERSTANDBLUE
10% off the whole store at A Colorful Life Designs - LydiaFan10
5% off at LBC here with code LYDIA5
Arkon Mounts - 20% off sitewide with code UNDERSTANDBLUE


Tuesday, November 1, 2022

VIDEO: Creating Perspective With Layering Dies + Clean Craft Room

*Compensated affiliate links used where possible at zero cost to you. No posts are ever sponsored or paid.*

I did not make ANYTHING this weekend because I spent all day Saturday cleaning my office and I wanted it to stay that way for a day! Do you ever do that? It's usually pretty short lived, so I thought it was worth a day of a pristine desk. 

I'm trying to get back to the Marie Kondo mode I was in before 2020 hit. There are two closets I need to do, and then get rid of some furniture we don't use. I have a GORGEOUS dining room table from Ethan Allen that has maybe been used three times? SO impractical. Why do we buy thing you "have" to have even though you don't invite twelve people over for dinner? So dumb. So if you live in Austin and want to buy a stunning dining room table and chairs and you DO have twelve people over for dinner, let me know!

So everything I'm showing you today I made a few weeks ago when our first cold snap hit. 

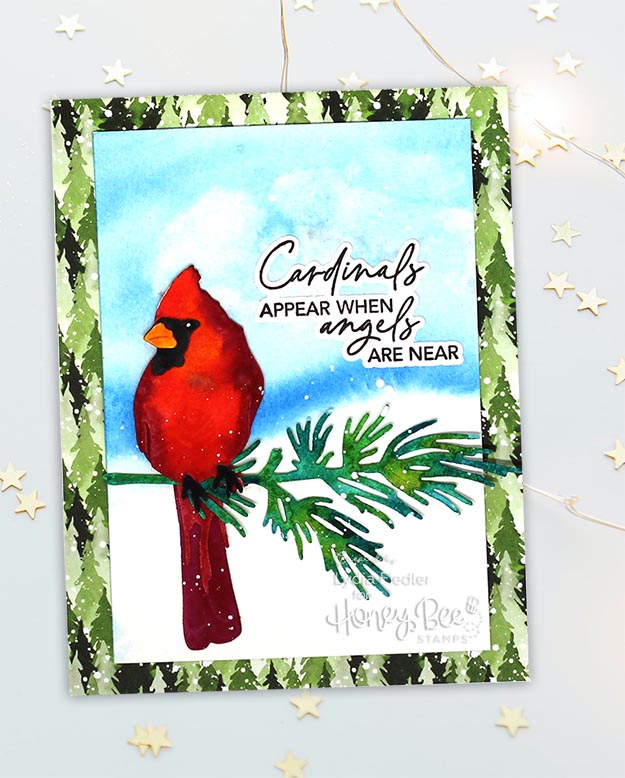
You'll see me me make this whole card in the video, so I won't go over every detail, but what I loved about it is the beautiful cardinal and foliage dies gave me the ability to create background and foreground perspective with layering dies. It's REALLY fun. And it's watercolor, so that always makes me happy. I'll teach you how to make the clouds as well. 


Like this post? Never miss a post by following me!

I also love a good Christmas angel! For this one, you will not believe this, but when I used this background die that debosses and cuts, and rubbed it with this new gold ink, I then used a WHOLE QUARTER sheet of this disco ball paper I've been hoarding! A WHOLE QUARTER SHEET. I feel like I should get an award. It's sooo sparkly. I used it for the halo of the angel as well. I stamped the angel in gold ink on gold foil, embossed it with gold embossing powder and then cut it with the matching dies. Such a subdued card.


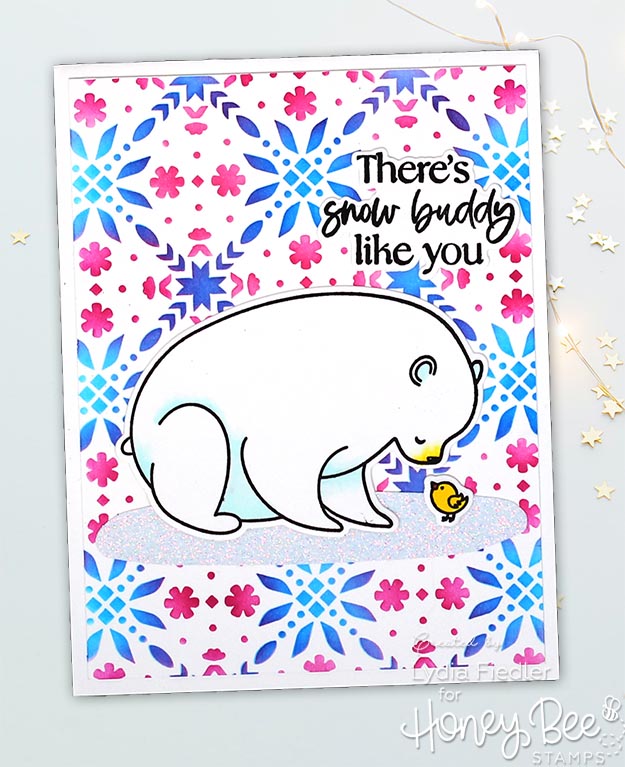
The last one - I had to use the Nordic looking layering stencil in blue and pink - overlapping the inks a bit to get a blue violet. Such a fun winter pattern! Then I stamped this bear and his little friend, coloring him with OLO markers and even reflecting the chick color onto his face.

CURRENT COUPON CODES
20% off anything at Glassboard Studio  - UNDERSTANDBLUE.
10% off anything at OLO MARKER
15% off anything at Marker Universe or any of their other sites - Understandblue15.
10% off at Sweet Sentiment with code UNDERSTANDBLUE
10% off the whole store at A Colorful Life Designs - LydiaFan10
5% off at LBC here with code LYDIA5
Arkon Mounts - 20% off sitewide with code UNDERSTANDBLUE

So here's the watercolor video and be sure & check out the giveaway on my channel.


Loveyameanitbye.


Friday, October 28, 2022

Victorian Christmas Northern Lights

*Compensated affiliate links used where possible at zero cost to you. No posts are ever sponsored or paid.*

I've told you before that I lived in Maine for a summer, and saw the Northern Lights there. And I thought it was aliens or the end of the world. 

I had always imagined the Northern Lights to be rainbow colored, so the shimmery, solid green, moving lights were a huge surprise to me, and will forever be what I think of when I think of the Northern Lights. My aversion to cold weather *probably* means I won't see them again, unless they move south! However, I STILL might see aliens, so there's that.

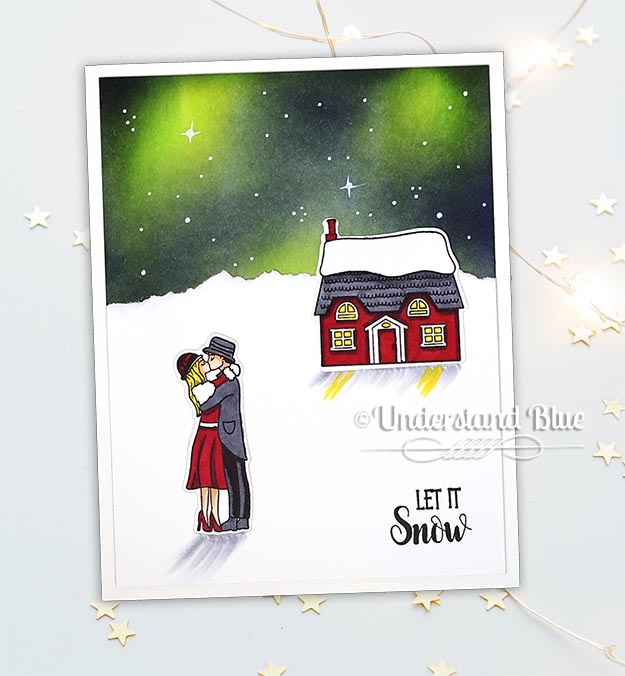
I thought it would be the perfect background for a Christmas card with a lot of red on it, so I chose this Victorian style Christmas set that has such sweet little details, and I colored it mostly red with Graphit Markers. I put some little shadows down on a torn piece of paper that I used for snow. What I do when I'm adding shadows to die cut images is I set the die cut onto the card and draw a faint pencil line underneath it. Then I remove the die cut, make the angled shadows, and then glue the die cut down.

I did the stars with a Posca pen, and while the paint was wet, flicked two stars "legs" out with a white gel pen.


Like this post? Never miss a post by following me!

I will have the video for this background in the coming weeks, so stay tuned for that. There's some more REALLY beautiful holiday things that you'll be seeing me work with soon here.

Loveyameanitbye.

CURRENT COUPON CODES
20% off anything at Glassboard Studio  - UNDERSTANDBLUE.
10% off anything at OLO MARKER
15% off anything at Marker Universe or any of their other sites - Understandblue15.
10% off at Sweet Sentiment with code UNDERSTANDBLUE
10% off the whole store at A Colorful Life Designs - LydiaFan10
5% off at LBC here with code LYDIA5
Arkon Mounts - 20% off sitewide with code UNDERSTANDBLUE


Friday, October 21, 2022

VIDEO: Extending Tree Dies + Giveaway

*Compensated affiliate links used where possible at zero cost to you. No posts are ever sponsored or paid.*

I came up with a super fun way to SUPER SIZE your layering tree dies this week! I refuse to buy tags for gifts - probably all that exposure to fun Tim Holtz techniques on tags have ruined me for storebought tags - I prefer to go all out, so that's what you'll see in the video, despite how easy what I'm doing is. I used the asymmetrical tag die for the base, with cold press watercolor paper (caution - I use this as a "water friendly" paper, not a true watercolor paper, because it does not state that it's 100% cotton - but it's perfect for mixed media techniques and very inexpensive. I've had the same pad for years.) I cut it again from a book page and glued those together. I used the same dies to cut Christmas from glitter paper. I used this gorgeous tree die with the same watercolor paper and did wrinkle-free distress ink smooshing with Oxides (colors listed in video). The tree die is meant to make smaller trees but you'll see how I extended mine in the video. The garlands are from dies in the set and I used the same book paper.


Like this post? Never miss a post by following me!

Here's the video - be sure to watch on YouTube because there's giveaway info in the description.


Hope you have a great weekend planned! I'm trying a new recipe so I'll let you know how it is!

Loveyameanitbye.


CURRENT COUPON CODES
20% off anything at Glassboard Studio  - UNDERSTANDBLUE.
10% off anything at OLO MARKER
15% off anything at Marker Universe or any of their other sites - Understandblue15.
10% off at Sweet Sentiment with code UNDERSTANDBLUE
10% off the whole store at A Colorful Life Designs - LydiaFan10
5% off at LBC here with code LYDIA5
Arkon Mounts - 20% off sitewide with code UNDERSTANDBLUE


Saturday, October 15, 2022

VIDEO: Halloween Collage & New Collage Workshop!

*Compensated affiliate links used where possible at zero cost to you. No posts are ever sponsored or paid.*

Howdy friends! If you've followed my lives for a while, you KNOW I love collage! And today I am SUPER excited to announce two things. I have moved all my online classes to a new website. Over the past two years, I've used Facebook for my online workshops and classes, but that no longer feels like a good option to me, for lots of reasons I'll save for another day. 

So I'm adding my back-catalog of classes slowly on the new site, but today I've added a new collage class that I'm really excited about! In college art classes and art history classes I first got bit by the collage bug. My art teacher had us spend several weeks on surrealism and we did a lot of surrealist collage, which is something I do almost weekly - and do not publish. I just do it for my own enjoyment, and now I'm sharing that with you! So the new class has NINE lessons and you will learn how to organize your supplies, learn basic collage skills, learn surrealist collage, tips, techniques, and finally an advanced painting style of collage. 

My other previous classes that are there - so please be sure you haven't already taken those before registering :). Here is my classroom!

So to celebrate my new collage class, I have a collage video for you today with a fun Halloween vibe.

I used two vintage Halloween books - this one and this one - for the skeleton, Raven and the Poe sheet. 

I accented the skelly with ultra fine gold glitter.

In the video, you'll see me have some fun with a beautiful wax stamper as well - I was going to use it on the card but ended up not having room.


Like this post? Never miss a post by following me!

Fun, right? Here's the video


I hope you join me in an online class soon!

Loveyameanitbye.


CURRENT COUPON CODES
20% off anything at Glassboard Studio  - UNDERSTANDBLUE.
10% off anything at OLO MARKER
15% off anything at Marker Universe or any of their other sites - Understandblue15.
10% off at Sweet Sentiment with code UNDERSTANDBLUE
10% off the whole store at A Colorful Life Designs - LydiaFan10
5% off at LBC here with code LYDIA5
Arkon Mounts - 20% off sitewide with code UNDERSTANDBLUE


Sunday, October 9, 2022

Veggie Love + Perfect Hashbrowns

*Compensated affiliate links used where possible at zero cost to you. No posts are ever sponsored or paid.*

I was flipping through my watercolor sketchbook the other day, and I realized that the VAST majority of my sketches are veggies and fruits. Why are they so pretty? One of my fave sketches I've ever done was an orange. I used this tiny detail brush to add the teeny segments and it was so zen and fun. 

I think the textures and colors of plants is just so interesting. I can't imagine sitting down to paint a chicken breast hahah.

Anyway, I was woken up at 3 AM by a cat and never got back to sleep so I just got up and watercolored. The thing about watercolor is that it's a VERY quiet crafty activity that doesn't bother people who CAN go back to sleep after catnanigans.

Luckily, I had die cut these beautiful veggies on Friday, but had only stacked them up with their matching foliage because Friday was insane. 

So I grabbed my Daniel Smith splits and went to town. All the colors are from the Lydia Split except for Hooker's Green which is in the D split - and is the PERFECT jalapeno pigment.

I did wet on wet watercolor, and that's how I got those fun shadow blends - I HEART the radish one - so pretty. 

The set has a matching sentiment, but I liked the very bold sentiment from this set because I used SO many of the die cuts that it needed balance. These dies are so very realistic.


Like this post? Never miss a post by following me!

If you were in my Gel Press live Friday, then you saw this pretty brayer cleaning sheet I used with this big Thank You die. It's a triple cut die, so you have lots of possibilities. I went for the outer die and the second layer die, leaving the third layer out so it was left white. The paints are golden open - that's why they look so glowy.


CURRENT COUPON CODES
20% off anything at Glassboard Studio  - UNDERSTANDBLUE.
10% off anything at OLO MARKER
15% off anything at Marker Universe or any of their other sites - Understandblue15.
10% off at Sweet Sentiment with code UNDERSTANDBLUE
10% off the whole store at A Colorful Life Designs - LydiaFan10
5% off at LBC here with code LYDIA5
Arkon Mounts - 20% off sitewide with code UNDERSTANDBLUE


Want the best hashbrown recipe EVER? My friend Bev gave me a tip that is a game changer, and I just realized when I pulled up this recipe that I haven't made these in a year - I need to fix that!

If you have a Kitchen Aid, it's super easy, but a box grater or mandolin with a grater blade would be just ducky. Here's the recipe!

Loveyameanitbye.


Monday, October 3, 2022

CASE Me a Christmas Card with Michelle Lupton

*Compensated affiliate links used where possible at zero cost to you. No posts are ever sponsored or paid.*

I'm back! Today is my day with my friend Michelle Lupton in her CASE me a Christmas Card series - a holiday tradition around here. It's a just for fun series she does every year with amazing guests!

The idea is that each of us picks a card from each other's blog to CASE (copy and share everything) and turn it into a Christmas Card. 

For my card, I chose this darling vintage holiday image, and I colored it with colored pencil, adding the details back with a Micron pen. I created the "floor" with this stencil, a brush and blue raspberry ink, masking it off with Post-It tape and doing secondary light blending over the stenciled area to create a solid surface. 

Here are the things I incorporated from Michelle's incredibly adorable card you will see below:
  • Pink and blue as the dominant color scheme
  • Checkerboard style "floor" using this stencil (coupon below)
  • CAS design
  • Right centered focal point with left positioned sentiment
  • Angled shadow
  • Vintage art style
Like this post? Never miss a post by following me!

Here's Michelle's post with her adorable card - shared with permission here. She drew her "floor" which on her card is a gingham tablecloth. So, so sweet. If you are not already following her on Instagram and YouTube, please do so - she's amazing. 


Now this is a two way process, so today she picked one of my cards to CASE.

See Michelle's card HERE where she CASEd ME :) or by clicking the graphic below.


CURRENT COUPON CODES
20% off anything at Glassboard Studio  - UNDERSTANDBLUE.
10% off anything at OLO MARKER
15% off anything at Marker Universe or any of their other sites - Understandblue15.
10% off at Sweet Sentiment with code UNDERSTANDBLUE
10% off the whole store at A Colorful Life Designs - LydiaFan10
5% off at LBC here with code LYDIA5
Arkon Mounts - 20% off sitewide with code UNDERSTANDBLUE

Hope you have a great week!

Loveyameanitbye.


Winter Scene Building with Small Stamps

*Compensated affiliate links used where possible at zero cost to you. No posts are ever sponsored or paid.*

Today I am bringing you some simple wintery ideas, and a few fun ways to use those smaller stamps to build scenes. The first idea is so simple - it's repetition! We often use small stamps on clean & simple cards - as a small focal point with a clean background, but as you'll see with the small tree and deer from this month's Hero kit - you can fill a card by repeating images. I started with Soft Granite Ink - with the tree on an acrylic block, and I stamped the grey trees you see in the center at full strength, and moved away to stamp again with the leftover ink, repeating this process maybe a dozen times - I wanted a prominent row on the middle section and lighter trees above and below.

Next, I did the same, but with black ink - so that a few trees really popped and became focal points - stamping the leftover ink trees among the grey trees as well. It gives the feeling of snow in between you and the lighter trees doesn't it?

Then I took the deer from the kit and stamped him in black in the foreground.

I used an OLO Marker to create shadows for the trees and deer, leaving the top of the card white to look like an upsloping snowy hill. The placement of the trees adds to that vertical feeling as well.


Like this post? Never miss a post by following me!

Here's what the full kit looks like - it has a snowy cling stamp too! Love the village.

Here are all the add-ons this month - and I have a card with one of the dies. They have a sentiment strip Christmas tree! And dies that cut the strips - so if you want just greetings, this is a great combo, but it also makes super cute cards with the tree, as you will see today.


Yesterday's card (details here) used the tree again from the kit to make a tiny subtle rainbow.


Two books about winter made a BIG impact on me as a kid. The Snow Queen, and The Chronicles of Narnia. I remember so vividly the sleighs in both! And, for the Frozen generation, the Snow Queen - incredibly dark, as per Hans Christian Andersen's style, is what that is loosely based on. I've never seen it - I'm not a big Disney fan, and the song is so annoying I think it could be fatal. But anyway, you should read the book. The sleigh is basically a character in the fairy tale - an alluring character. As it is in Narnia, driven by the White Witch and pulled by the white reindeer. Yet another reminder that winter is objectively terrible!! Narnia must be out in the universe this week too - because one of my food groups posted a recipe for Turkish delight! I've never made it myself so I might have to try. This recipe site never fails me so maybe I'll try their version.

Anyway, all that to say, this sleigh die  reminded me of those bewitching sleighs! I decided to make it as alluring as possible, with silver and pink glitter paper. The background uses the birch trees stencil (I'll be using this in my Stamp-Along class, if you are attending!) with Splash ink, and over that, I used the new snow stencil and acrylic paint to add snow. The colors give it such a 50s feel. The sentiment is from the strip tree.


Want to see more inspiration? Start at the Hero Arts Blog. Leave me a comment, as well as the other inspiration blogs today for your chance to win a $50 shopping spree! Enter by October 9th, and the winner will be announced on the Hero Arts Blog the following week!

Loveyameanitstayawayfromladiesinsleighsbye.


CURRENT COUPON CODES
20% off anything at Glassboard Studio  - UNDERSTANDBLUE.
10% off anything at OLO MARKER with code UNDERSTANDBLUE.
15% off anything at Marker Universe or any of their other sites - Understandblue15.
10% off at Sweet Sentiment with code UNDERSTANDBLUE
10% off the whole store at A Colorful Life Designs - LydiaFan10
5% off at LBC here with code LYDIA5
Arkon Mounts - 20% off sitewide with code UNDERSTANDBLUE


Saturday, October 1, 2022

SUBTLE Rainbow Winter Trees + World Cardmaking Day Live Hop!

*Compensated affiliate links used where possible at zero cost to you. No posts are ever sponsored or paid.*

Happy Caturday! I have two fun things for you today - a little sneaky peeky of this month's Hero Arts kit, and it's beginning to feel a lot like Christmas!

I'm keeping it simple this month, taking advantage of the detailed silhouette images in the set and using shadows to give them dimension. 

For this card, I used one of the trees from the set and using a small acrylic block, I stamped them in Hero Hues, just SLIGHTLY overlapping to create tiny pops of orange, green and purple! Like a little hidden rainbow - look closely!

I did flicking with an OLO marker at an angle to create shadows underneath, which instantly makes them look dimensional. SO simple and quick. The large sentiment is from the set as well.

Like this post? Never miss a post by following me!

There are more fun peeks today with some of the other images from the kit on the Hero Blog.
And - since it's world cardmaking day - please join me in a fun LIVE YouTube hop! They are short, 20 minute sessions and you will be automagically redirected throughout the hop as each live ends. I do NOT pretend to understand how that's going to work. I will be doing a quick Gel Press technique! I'm not on till 11 Central, but you can start the hop HERE at 10 AM Central. There's also a zoom party afterwards and giveaways!


Whatever you decide to do today - make it CRAFTY!

Loveyameanitbye.

CURRENT COUPON CODES
20% off anything at Glassboard Studio  - UNDERSTANDBLUE.
10% off anything at OLO MARKER
15% off anything at Marker Universe or any of their other sites - Understandblue15.
10% off at Sweet Sentiment with code UNDERSTANDBLUE
10% off the whole store at A Colorful Life Designs - LydiaFan10
5% off at LBC here with code LYDIA5
Arkon Mounts - 20% off sitewide with code UNDERSTANDBLUE


Related Posts Plugin for WordPress, Blogger...