
*Compensated affiliate links used where possible at zero cost to you. No posts are ever sponsored or paid.*
CURRENT COUPON CODES
20% off anything at Glassboard Studio - UNDERSTANDBLUE.
15% off anything at Marker Universe or any of their other sites - Understandblue15.
10% off at Sweet Sentiment with code UNDERSTANDBLUE
10% off the whole store at A Colorful Life Designs - LydiaFan10
5% off at LBC here with code LYDIA5
Arkon Mounts - 20% off sitewide with code UNDERSTANDBLUE
I've been working through some Splitcoast challenges in my daily lives on Facebook and MAN did I have fun with the Technique Lover's challenge this week! Here's how it started...
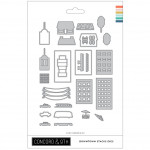
I was answering the site emails at work a few days ago, and a nice lady named Cindy asked what colors were used on some stunning tags in our gallery by Janine Brain for the TLC challenge. I found the tags, but I didn't know what colors she used, so I suggested she PM her and ask. But I couldn't get the tags or the technique out of my mind, so I tried it and filmed it and that's what you'll see today. It's fingerpainting without the mess! SO fun and satisfying. I used a pink, an orange, a yellow and a deep magenta paint for this first one, after masking it off with masking paper, and while I originally intended the masked white area to be snow, I flipped it upside down and it really looked like mountains! Which made me wonder if they hadn't based the dies in this bundle on downtown Salt Lake City, because when I cut them out (I backed them with holographic paper for a downtown feel) and put them against my "mountain" that's exactly what it reminded me of. I colored the benches, bushes and trees with Copics, and put the panel onto one of my pre-cut and scored slimline cards.

Supplies:
Now here's what the sample where I tried to recreate Janine's color scheme for her wintery tags. I used Grey, Blue and Purple paints for this and masked off the "snow." I haven't had the heard to cut down this full sheet yet but I want to make them into bookmarks for my Buy Nothing group.

Supplies:
I wanted to try the same thing with watercolor. I used pink, yellow and blue liquid watercolor in my mixed media paper notebook - and, because I added zero water - just used pure pigment, there's no fading and they stayed super vibrant! I love this! Who knows if I'll ever cut it up and use it - it's so pretty the way it is!

Now here's the thing - I've been trying out this mixed media paper, which I love, and I noticed that it has kind of an unusual surface, and I wanted to try it with colored pencils. So I die cut the ice cream cones (there are matching stamps, but I just wanted the die shapes) and I did some no-line coloring and it works beautifully! I got all the fine details of the cone with four colors, and then very simply colored the ice cream. The paper is great for pencils. I had to google ice cream cones to see the patterns I needed to use - it's been that long since I've had an ice cream cone! But my googling showed a very consistent pattern for the soft serve cone - I never can remember which style is called a sugar cone and which style is called a cake cone. Maybe you do?
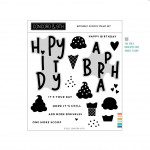
Then I took the little dotty stamp from the set and made the background with white ink on Mushroom cardstock. The ink I used for this fun layering birthday sentiment is Mushroom and Wheat. I know my lighting makes it look black, but it's not - it's just Mushroom stamped three times for clarity.

Ice Cream Dies & Dots & Birthday Sentiment
Mushroom Cardstock


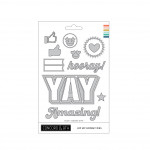
I guess 2021 is the year of the shaker for me! Since finding edge-to-edge shakers, I've made more this year than in the last ten, so when I saw this Yay die, I knew I could fill it up with sequins for a fun birthday shaker. The die cuts the part you see that's the opening AND the black shadow, so what I did was cut into the card front with the letters, and adhered acetate on the back side. Then I cut the die again with black cardstock, and glued that to the front of the acetate in the opening cut by the letters, creating the shadow. I flipped that over, and used these foam squares to just frame the letters and then filled it with these sequins. Then I adhered a piece of copy paper over the opening, peeled off the liner paper on the squares (adding one in each corner) and adhered it to the card base. I used to live in FEAR of adhering shakers crooked, but now I put the card base into my MISTI, add the 1/8" alignment guide in the corner and use that to perfectly place the shaker panel! (PS her shop for the guides is taking a break, but you can sign up to get an email when she's back.)
Supplies:
So you ready to see the video? It's SUPER fun to do this - you should try it today!
Here are all the supplies I used today:
|


I wanted to tell you about a super interesting book someone suggested I listen to. It's called Glow Kids and it's about the effect of digital devices on our brains.
It's actually pretty frightening - he goes into the science of digital addictions in children. I did not know prior to this book that that is a growing field of psychology and there are therapists who specialize in kids with digital addictions.
Makes me very glad for my Gen X childhood - I didn't even have a TV for most of it. That could be why notification bubbles have no effect on me, but they stress out younger people. For example I have 904 unread text notificatins, 2086 notifications from my podcast app group and 218 unplayed voicemails - I literally don't notice any of that. The only time I have my phone in my hand is when I'm trying to take pictures of Clarence. I hate typing on the the danged thing and it mostly sits on the charger and plays podcasts for me. So all of this is pretty foreign to me, but I would definitely think parents would want to listen to this book, so if you are so inclined, give it a listen or a read. It will be an eye opener.
I hope you have a good weekend ahead!
Loveyameanitbye.

Lydia, Your link says "This video is private."
ReplyDelete