I'm back with the video and the pattern!! Be sure and click through to YouTube and leave a comment to be entered to win. A few notes:
This is the easiest 3D project I've ever tried and it was perfect the first time.
Liquid glue is a necessity - strong tape would be a disaster.
Hold the frame once one side is completed to let the glue grab.
If you are impatient, like me, you can add glue if you didn't do the previous step.
Please visit the original creator of this idea through the on-screen link I provide in my video - her channel and Instagram account are an absolute DELIGHT.
Hey friends! Life has been busy lately but I have a lot of fun things for you today, including something quite rare for me - a 3D project that is so easy and perfect the first time you won't believe it. But you'll have to wait a day because the video and giveaway go live tomorrow at 9 AM Central. If you want to bookmark it - the video is here.
I used this beautiful dog that reminds me so much of a friend's dog who recently passed - I'm going to send her this little desk frame. The black part - it's hard to see - is this incredible DIY frame that makes perfect mitered corners SO easily! When I come back with the video tomorrow I'll post the PDF pattern with instructions. I followed an Instagram reel to make it and I've truly never had a 3D project turn out this well the first time - it's not my forte - so that tells you how good the instructions are.
Sometimes it's fun to get back to your roots, right? I enjoy doing things that don't result in a "perfect" card, as you know, and sometimes I forget that I don't have to die cut EVERYTHING, even though I'm a die fiend, and that hand cutting adds some whimsy and charm to a card.
So I have a video coming on this card tomorrow, with some tips and tricks for you, but in the meantime, just enjoy a retro valentine with this sweet, sort of mid-century gal, and I'll be back tomorrow!
CURRENT COUPON CODES
10% off stamps, stencils and dies at TRHD here with UNDERSTANDBLUE
Howdy! I'm back after a nice long holiday break and ready to give you some crafty goodness! I have a new video for you today with a fun and easy spotlighting technique using background stamps. The sentiment is from this set.
I decided to use grey ink to really highlight the contrast between the spotlight piece and the background, and it ended up looking stormy, which is very fun.
I have some great tips for you on how to align these pieces and tips for stamping to make that easier too.
Here's the video - Happy New Year!
Loveyameanitbye.
CURRENT COUPON CODES
10% off stamps, stencils and dies at TRHD here with UNDERSTANDBLUE
I had every good intention of doing Christmas cards this past weekend and I couldn't get to it. I worked for part of the weekend, and then the rest got away from me. Not sure it will get done this year, even though I have a stack of cute ones like I'm going to show you today!
My last video was part one of two, so today you get part two. The process is similar, but I'm starting with patterned paper, which makes a huge difference - it just does a lot of the work for you.
I started with this wood plank embossing folder, which is a 3D folder with lots of detail that's perfect for this easy technique. Also - mixing the paints makes a HUGE difference in visual interest as does adding a complementary color.
Before I put it down onto my background, I masked a little triangle and ink blended white ink to make the headlight glow. The sentiment is from this set.
Here's the video:
Have a great week!
Loveyameanitbye
CURRENT COUPON CODES
10% off stamps, stencils and dies at TRHD here with UNDERSTANDBLUE
One cold snap and I'm already done with winter - how about you? I saw that some areas of the country are having a colder than normal start to winter. Always no to that!
So it was fun to do some springy things this month and look ahead a tiny bit, even though I'm supposed to be putting up the Christmas tree.
First up - this month's studio release - it's so bright and happy. I am starting with these gorgeous, modular butterfly dies that cut into a card panel but stay attached so you can lift the wing. I cut one wing, and then I cut the body of the butterfly which also stays attached, but I snipped it out and drew antennaes on. The scripty hello is from the main kit. I taped off the area around the wings and ink blended them. The black card base shows through the area under the wing. Fun interactive card!
After you mask the ballerina, if you are using paint, especially - leave the stamp in your MISTI so you can overstamp the image again in case any paint gets past the masking paper. Works like a charm! This image is from the main card kit.
I used the actual die as a stencil to create the shadow. I have a whole class on creating shadows and reflections HERE.
This is a beautiful release! Get in a spring mindset by visiting the hoppers today - leave comments for your chance to win a $50 gift card and go shopping!
It's critter chaos Christmas! It's also kit release day so I'm going to show you two of my faves.
First - this adorable fox tag! This little guy is the perfect size for the tag stamps in the kit so I put him on a circle die cut that I ink blended with Key Lime. I blended the back side as well. I colored the fox with OLO markers and added some twine!
I actually did partial die cutting on it so the back of the tag is one piece but I forgot to take a picture.
I LOVE this next card! I feel so proud of myself hahah.
I created a "room" by using my classic floor/corner technique, and then I took a really sticky piece of tape on top of it to lift the top layer of the cardstock, so I could peel it down like it was wallpaper for my chaotic kitty!
Hello friends! I don't know if you're aware of this, but cats don't know anything about time changes, so I'm yawning while typing this. I think it's harder for those of us that already get up insanely early - I'm just conditioned to wake up between 4 & 5, so backing that up an hour by a confused cat or two is rough.
You know how much I love mixed media embossing, so today I have part 1 of 2 of a texture video where I'll show you the pieces below with a 3D brick and 3D wood embossing folder.
I am THRILLED that there's a Feliz Navidad die! Great news for us Texans - it's one of many holiday sentiments in the die set.
The turquoise piece was so fun and so pretty - wait till you see how I made it!! I didn't want to cover too much up so I used glitter paper and this Merry & Bright die.
The video I will break into two parts, but the techniques are similar for all!
I wanted to show you the full sheets before cutting one down into this adorable chimney. Sorry you can't see it but the snow and layers on the sentiment are glitter paper.
Look closely at the background paper - it looks like embroidered stars! So pretty.
The bricks actually have a rough texture like brick! So fun!
You will be able to see the video a week from today and there will be prizes!
Loveyameanitbye.
CURRENT COUPON CODES
10% off stamps, stencils and dies at TRHD here with UNDERSTANDBLUE
I'm coming to you today with one of my absolute favorite types of holiday posts - the CASE Me a Christmas Card series with Michelle Lupton.
If you haven't seen this before, what she does is invite a series of guests to do a mutual CASE - I pick a card of hers, and she picks a card of mine and we use those as our inspiration.
This year, something caught my eye as a theme in her account - and that is that she is a master of using analogous color. As I tend to gravitate towards complementary color combos, this intrigued me - because her cards have this really beautiful harmony!
So I selected one of her combos that she uses frequently for holiday cards - and that's blue and green - an analogous color combo I don't use that often - so that's a fun challenge for me!
I chose the fun two piece tree tag die and ink blended them separately with reactive inks - blue, purple, green and a blue green. I lengthened the tag as well with a die cutting trick you will see in my video. I used glitter paper and an alcohol marker to finish the scene.
When you look at this with a little collage I made of the inspiration pieces - I think you'll see how skilled she is in this part of the color wheel in every conceivable medium.
Here is a list of her inspiration cards included in the collage:
https://www.instagram.com/p/BxYBfDigqy3/
https://www.instagram.com/p/BrOKbsDH-Qg/
https://www.instagram.com/p/BcaZFkmAhkZ/
https://www.instagram.com/p/BIDvHUZASr2/
https://www.instagram.com/p/BHxp9zwALOu/
https://www.instagram.com/p/BF3MAUBkvOY/
https://www.instagram.com/p/C6PMEJQJLgr/
You can click here to see Michelle's CASE - we will be seeing this together! You can watch my video here at 3 PM Central!:
Enjoy - loveyameanitbye!
CURRENT COUPON CODES
10% off stamps, stencils and dies at TRHD here with UNDERSTANDBLUE
Happy kit day friends!! Even though I'm in my spooky season, the crafting world has some holidaying to do, so this month's kit is all about Christmas!
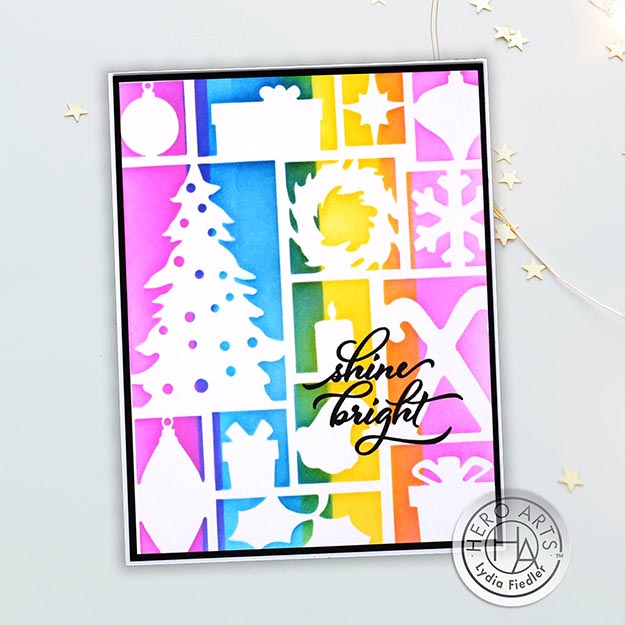
I wanted to do a bright and happy card to start today off with - whatever the opposite of two hurricanes is - I want that.
So I grabbed this fun Mondrian style Christmas stencil and just three colors of ink, and I taped off stripes and ink blended - letting the overlapping areas create the rainbow effect.
Here's what the full kit looks like - and LOOK at that die cut washi! That's what was in my sneak peek Saturday - it's so beautiful and looks so pretty on kraft cardstock.
Speaking of kraft cardstock - I wanted to use the background cling from the kit in a tone on tone here for the tag images from the kit - and I used primary colors in the background of these as well.
Stay tuned tomorrow when I will have a video using the kit for my collab with Michelle Lupton on her CASE Me a Christmas Card Series. You can sign up for the video premiere here:
You can also see the full release there! Enjoy!!!
Loveyameanitbye.
CURRENT COUPON CODES
10% off stamps, stencils and dies at TRHD here with UNDERSTANDBLUE
Anyhow - I'm happy to see October and of COURSE the Card Kit!!! I have a bunch of cards and a video this month, so be sure and come back here on Monday - but today I'm giving you a little sneak of one of the extras - a stunning scripty sentiment and die set.
But don't sleep on the STUNNING washi die cuts you are going to see! I put mine on kraft because it's such a warm image and I wanted to keep that warmth. I also added the new clay peppermints around the sentiment. Tip - to align these - put your card lined up on your sticky mat grid. Then line up a ruler along one of the grid lines and pop the mints on! Even round shapes are easy this way! I thought this cabin looked like a gingerbread house!
Want to see more inspiration? Head HERE to see the other team cards - and then come back on Monday!
LYMIB
CURRENT COUPON CODES
10% off stamps, stencils and dies at TRHD here with UNDERSTANDBLUE
I have a super fun spooky card for you today on this super soft and silky black cardstock that behaves really differently from the kraft cardstock and the pastel paper I normally use - and it was really fun. It ends up almost looking painted.
I used my normal colored pencils on my scarecrow, and I cut him out with the matching dies, and framed him against this spooky tree so the black edges of the die cut really don't show against the tree at all - such a fun effect.
The sentiment is from the same set and I just die cut a circle. What did we do before simple shape dies?
Here's the video!
Tuesday we get to start the REAL Halloween countdown! Can't wait.
Loveyameanitbye.
CURRENT COUPON CODES
10% off stamps, stencils and dies at TRHD here with UNDERSTANDBLUE
I started with these nesting postage dies, and I cut three stamps. I carefully masked the edges of these with Post-It tape around the edges and across the middle to create a horizon line. I used pink, orange and purple ink to create sky and ground. Then I used pieces of the haunted house stencil to create the little marks on the ground that match my inspiration piece below. I used this punch I found recently - that has a deep reach when you are punching farther into cardstock - and I punched a hole in masking paper to use for the moon.
Next, I cut apart the stamps from the little mariachi grouping, and stamped them on each colored scene. I mounted these three stamps onto black cardstock.
Here's my inspiration from the USPS:
Aren't those beautiful?
I hope you've enjoyed this - don't be afraid of stamp surgery - it helps you get a whole lot more out of your stamps!
Loveyameanitbye
CURRENT COUPON CODES
10% off stamps, stencils and dies at TRHD here with UNDERSTANDBLUE