How awesome would it be to just pop over there for a few hours - just for lunch? Or to snap some inspiration photos for your watercolor?
Pretty awesome, I think.
But for now, I have to get my inspiration from Google.
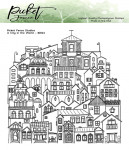
So that's what I did for this card. This city background stamp was perfect for a little Greek interpretation. In Santorini, there are those gorgeous domed blue roofs, but also little blue accents on railings and around windows and doors, sort of like in Santa Fe.
The blue is quite intense - I couldn't really find a good Copic match for it. Looking at photos, Cobalt blue pops into my mind, but having actually painted with true Cobalt, it doesn't match my perception of cobalt blue at all. It's not Ultramarine either. So I just picked a blue I liked and went with it.
After I colored the whole card front, even though it was painful, I cut a section out of the middle big enough for the Seriously die cut and added the tiny Merry Christmas from this set - we used this set and the coordinating dies in class last Saturday.
The cake set this month is so fun. I decided to do the spotlighting technique to show the contrast between the bright happy world with cake in it, and the dark and sad world we'd have without cake.
First, I stamped the image in black, and then used the 2.5" blending stencil - the mask portion, to cover up part of the cake, while I brushed on Morning Mist ink, trying to keep it darker near the cake with little foggy bits. Then I removed the mask, and took the negative part of the stencil and placed it around where the mask had been and used a Micron pen to outline the circle around the image. Then I colored the part that was spotlighted with Copics.
Then I took the latest in their braids series - German Braids and colored them purple like my friend Dana's hair! We made this card in class last weekend, brushing on Key Lime ink through the Points of Interest Stencil. I stole Ceal's idea from last month's girl - she made a necklace for her out of chunky glitter, so I did the same with rhinestones this month. The sentiment is just a single stamp new this month and sure to be used all year. I like how big it is. I'm getting blind in my old age.
You can see beautiful cards from the rest of the release here!
All the supplies I've used are below, and below that, the modifications I made to the recipe I posted the other day - I ate it yesterday and OMG is it delicious. I'll be back on Monday with some fabulous non-crafty Christmas gift suggestions!

|
Butternut Squash Stuffed Shells with Sage/Thyme Brown Butter
Original recipe here, via Bev Rousch. I modified this to be dairy and garlic-free. DELICIOUS. I think it would make amazing lasagne filling.
INGREDIENTS
- 1 large butternut squash (Pfft - yield of 1.5 lbs of mashed squash is perfect)
- 1-2 tablespoons olive oil (You don’t really need this much - I cooked my shells ahead so I brushed a bit of oil on to keep them from sticking together in the fridge)
- 15 jumbo pasta shells (that’s what my lasagne pan holds)
- 2 containers Treeline Scallion cashew cheese
- 1/3 cup Pimp My Salad Cashew Parmesan (dairy free)
- 1/2 cup packed fresh spinach (chop after measuring)
- 1 large egg
- 1 teaspoon salt
- 1/2 teaspoon pepper
- Crushed pepper or cayenne
- Zest and juice of 1 lemon
- 1/2 cup Miyoko’s butter (1 stick/8 TBS) (I thought this was a lot - I did half this and half a lemon)
- 8-10 fresh sage leaves (I did thyme because my sage died this year)
INSTRUCTIONS
Preheat oven to 350. Place whole, washed squash on a deep cookie sheet or in a casserole dish on parchment paper. I’ve been doing this for 30 years and never had a squash explode, but if paranoia has taken hold in your mind, you can cover the squash with foil. Cook until very soft to the touch - just squeeze with a potholder. Cut in half, scrape out seeds and mash the squash. Let it cool to warm room temperature before using in the recipe (this step can be done 2-3 days in advance and the cooked, mashed squash can be stored, covered, in the refrigerator). Raise the oven temperature to 400 degrees F.
Cook the jumbo pasta shells according to package directions and drain. In a medium bowl, combine the squash, scallion cheese, spinach, egg, salt and pepper, red pepper and fresh lemon zest. Stir well. Stuff the cooked pasta shells with the squash/cheese mixture and place them in a lightly greased 9X13-inch baking dish (depending on how full you fill the shells, you may not use all of them). Bake the shells for 18-20 minutes, until they are hot all the way through.
While the shells are making, prepare the brown butter sauce by melting the butter in a saucepan or skillet over medium-low heat until the butter is golden brown, about 10-12 minutes. Watch carefully as the butter can go from browned to burned in a short time. Add the sage leaves and cook until the leaves are slightly crisp (the butter should be hot and bubbly when adding the leaves so that the sage cooks quickly). Remove the pan from the heat and squeeze in the juice of 1 lemon.
Drizzle the sauce over the cooked shells and top with additional grated Parmesan, if desired. Serve the shells with 1-2 crisp sage leaves on top.
Loveyameanitbye








Great cards! I'm lucky enough to have been to Santorini. We saw the sun set and it was beautiful, but so packed full of tourists that the experience wasn't quite as romantic as we'd hoped. The blue is so intense in the dazzling Greek light, Jo x
ReplyDeleteI think you caught the blue very well based on pictures I just looked at of Santorini. You do need to go there. Seriously. Make a plan. So you. Maybe do a cruise with Kristin.
ReplyDeleteLife would be dreary without cake for sure
I almost called it Princess Leah hair but the smidge of German blood in me said no in no uncertain terms. She is much more the pretty milk maid...circa 2019 thanks to you :)
hugs Margot
It WOULD be a sad world without cake! I find myself eating smaller and smaller pieces, I just cannot take the sugar anymore. I was all about the corner piece in my younger days, ha! Love both of your cards, I'm not good at hair yet.
ReplyDeleteOh! I love how you colored just the roofs of buildings and made this stamp into a Christmas card! So beautiful. And oh, yes please on the teleporter technology!
ReplyDelete